Billing is a complicated issue for interior designers. With a multitude of potential pricing methods to consider, profitability should be your top priority when deciding how your business will collect for its services. Get down to the brass tacks by first determining your market worth on a price-per-hour basis, then develop a pricing strategy to meet that threshold. Whether or not you charge clients for your time explicitly, your profitability per project will always be tied to the amount of time you and your employees spend on it. Therefore, logging your collective working hours is crucial to staying in the black, and the more detailed your records, the better you will be able to control the profitability of your business in the future.
New to Design Manager? Try it free today

Before the Project Begins, Define a Pricing Plan
Beyond an initial client consultation, best practice for an interior design business dictates that every client project should begin with a contract defining the scope of work, pricing method, and anticipated payment schedule. A couple of things to note:
- Designers should use this contract as an opportunity to establish a clear roadmap of expectations with your client.
- Get every project started on the right foot by explaining each part of the agreement to your client in plain terms, particularly the budget and the project timeline, so they are not caught off-guard by unexpected fees or the number of invoices.
- If your pricing method includes charging an hourly fee for your time, outline what activities will count as billable time in the agreement.
- You may want to also include whether or not you will charge for other project-related expenses such as meals and travel. If you do not directly charge clients for your time or project-related expenses, you still need to measure what you spend on those resources and factor their worth into your pricing.
Having an organized system is key, and Design Manager has all of the tools necessary to make tracking time a seamless part of your everyday business administration. Design Manager’s platform lets you track time by importing calendar entries from other programs to be converted to time entries, and there is a stopwatch function on the Design Manager App to capture time entries as you work on them. It’s simple to then create an invoice for your time entries, and even show an entry as existing but not incurring a charge to the client. Read on to learn how to use Design Manager’s time billing and easy invoicing features.
Setting up Design Manager to Track Time for Billing
There are two main ways to record time entries within Design Manager. The first is to start with the Project Specifications menu, the same place where you input all of your merchandise, and the second is to use the “Employee Time” menu. Using either method takes some minor additional configuration.
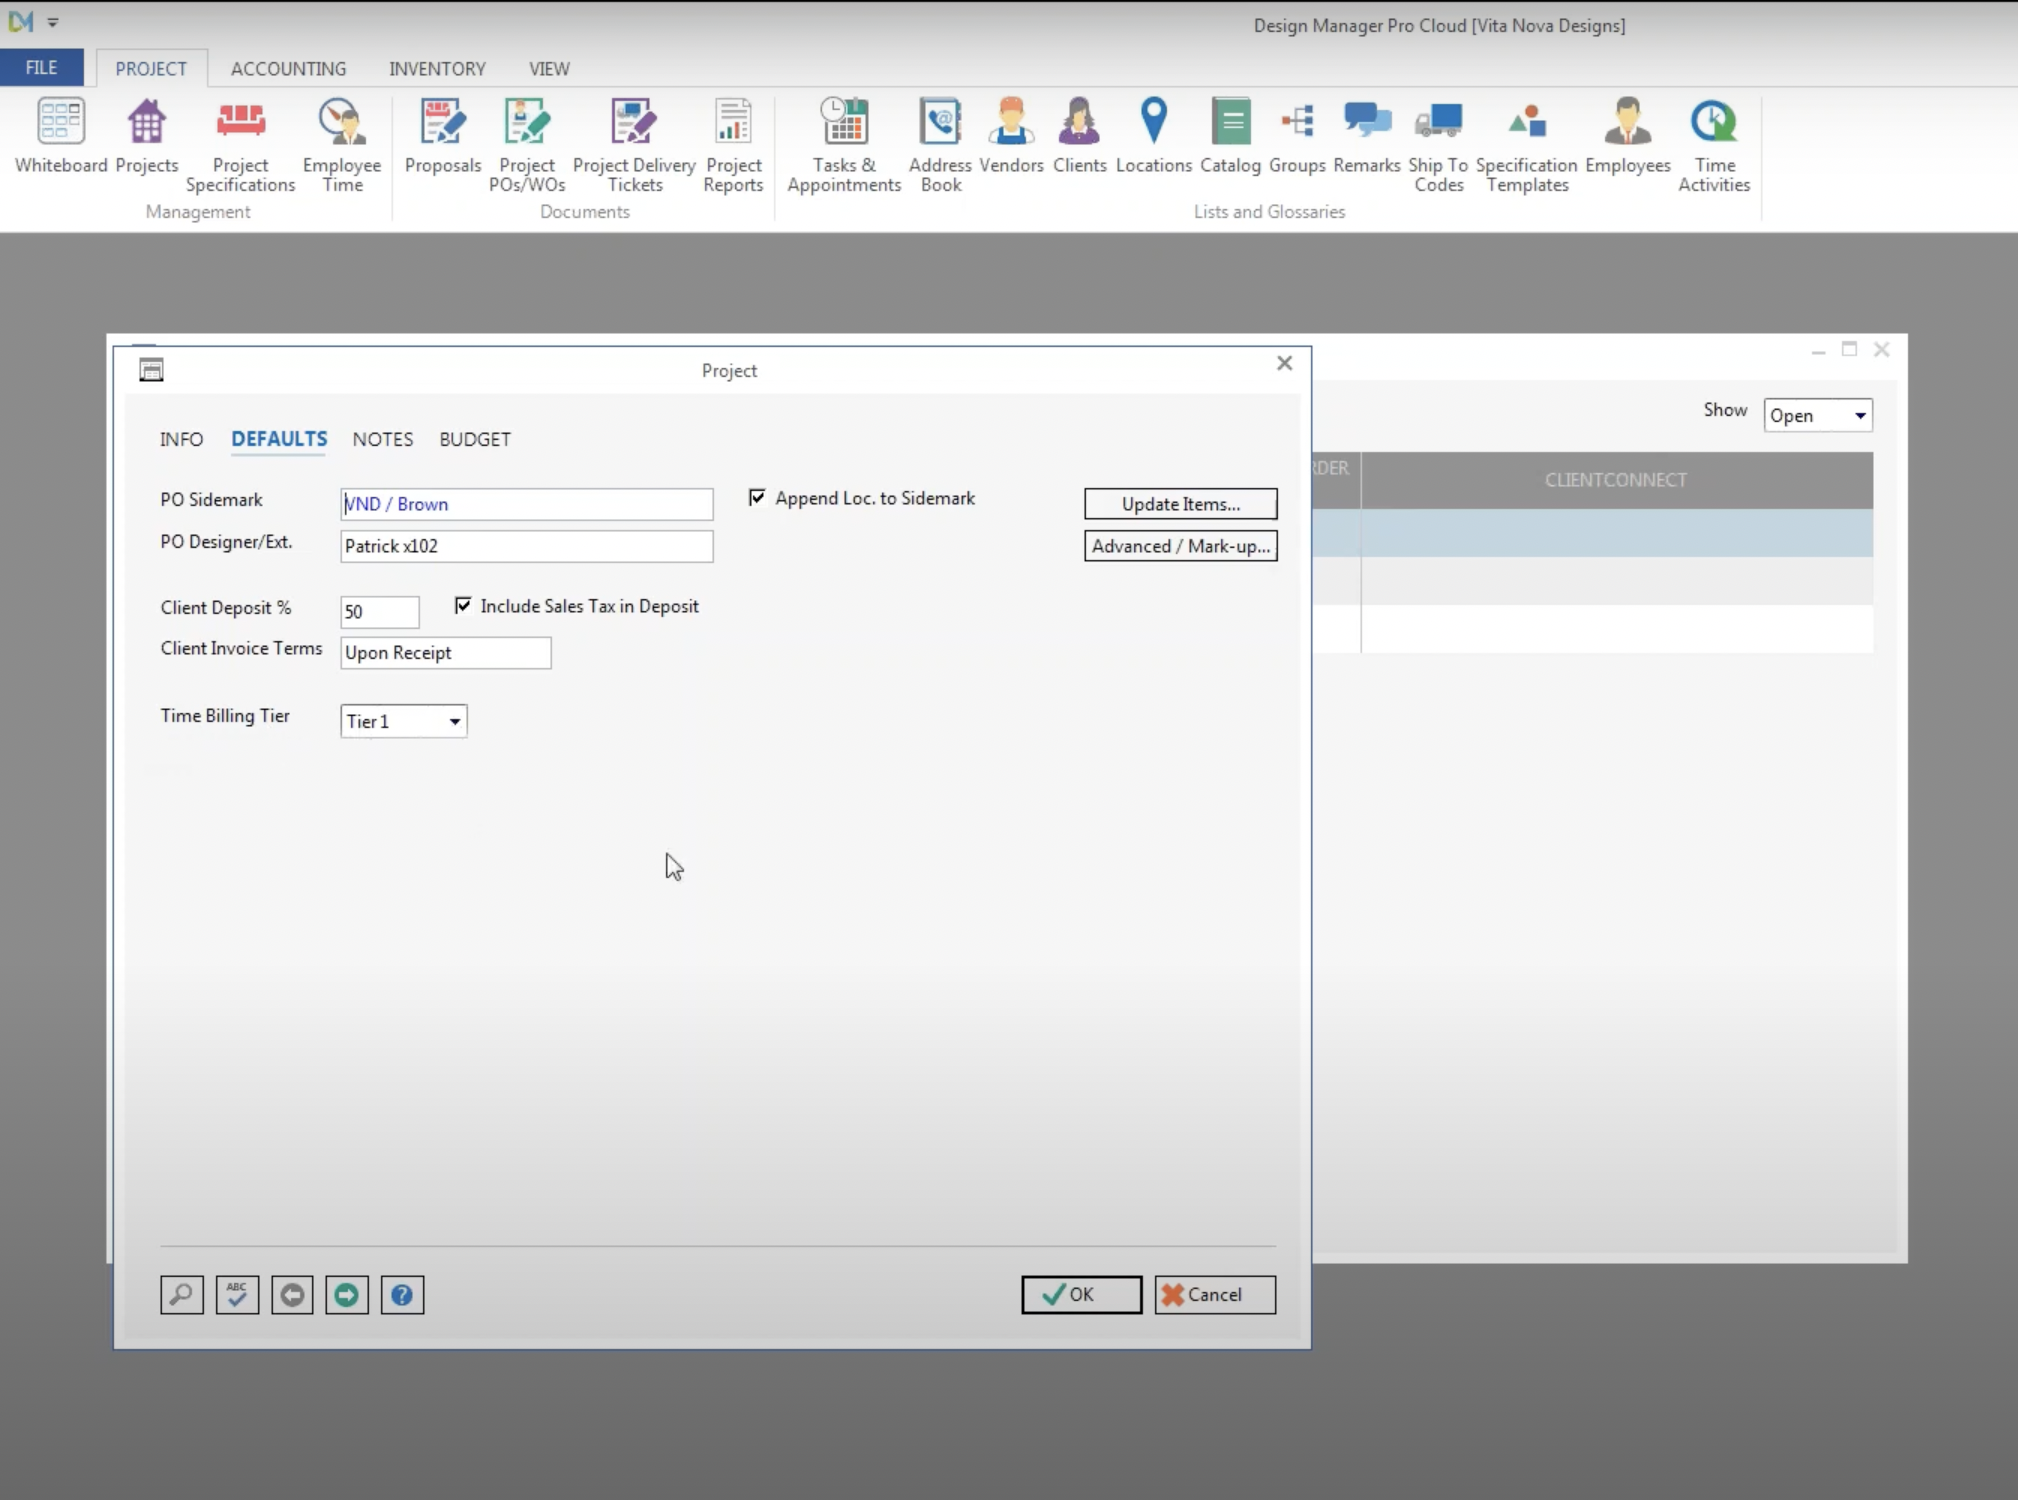
Let’s begin with the “Project, Time, Tier” concept. You can have up to three separate levels of billing rates and costs and assign those to each project.
- To access, click on the “Project” icon, then the “Defaults” link in the sub menu, where you will see a Time Billing Field. Here, you can designate Tier 1, 2, or 3.
 Another helpful tool in DM’s employee time billing system is the time activity glossary. You can access it by clicking the “Projects” icon (second from the left under the File tab of the Pro Cloud menu), then click the very last icon on the main menu bar, “Time Activities”. Time activities are a classification of the services being provided and help keep your record keeping and billing consistent. Designations may include “Design Time” and “AutoCAD”, for example - each billed at a separate rate.
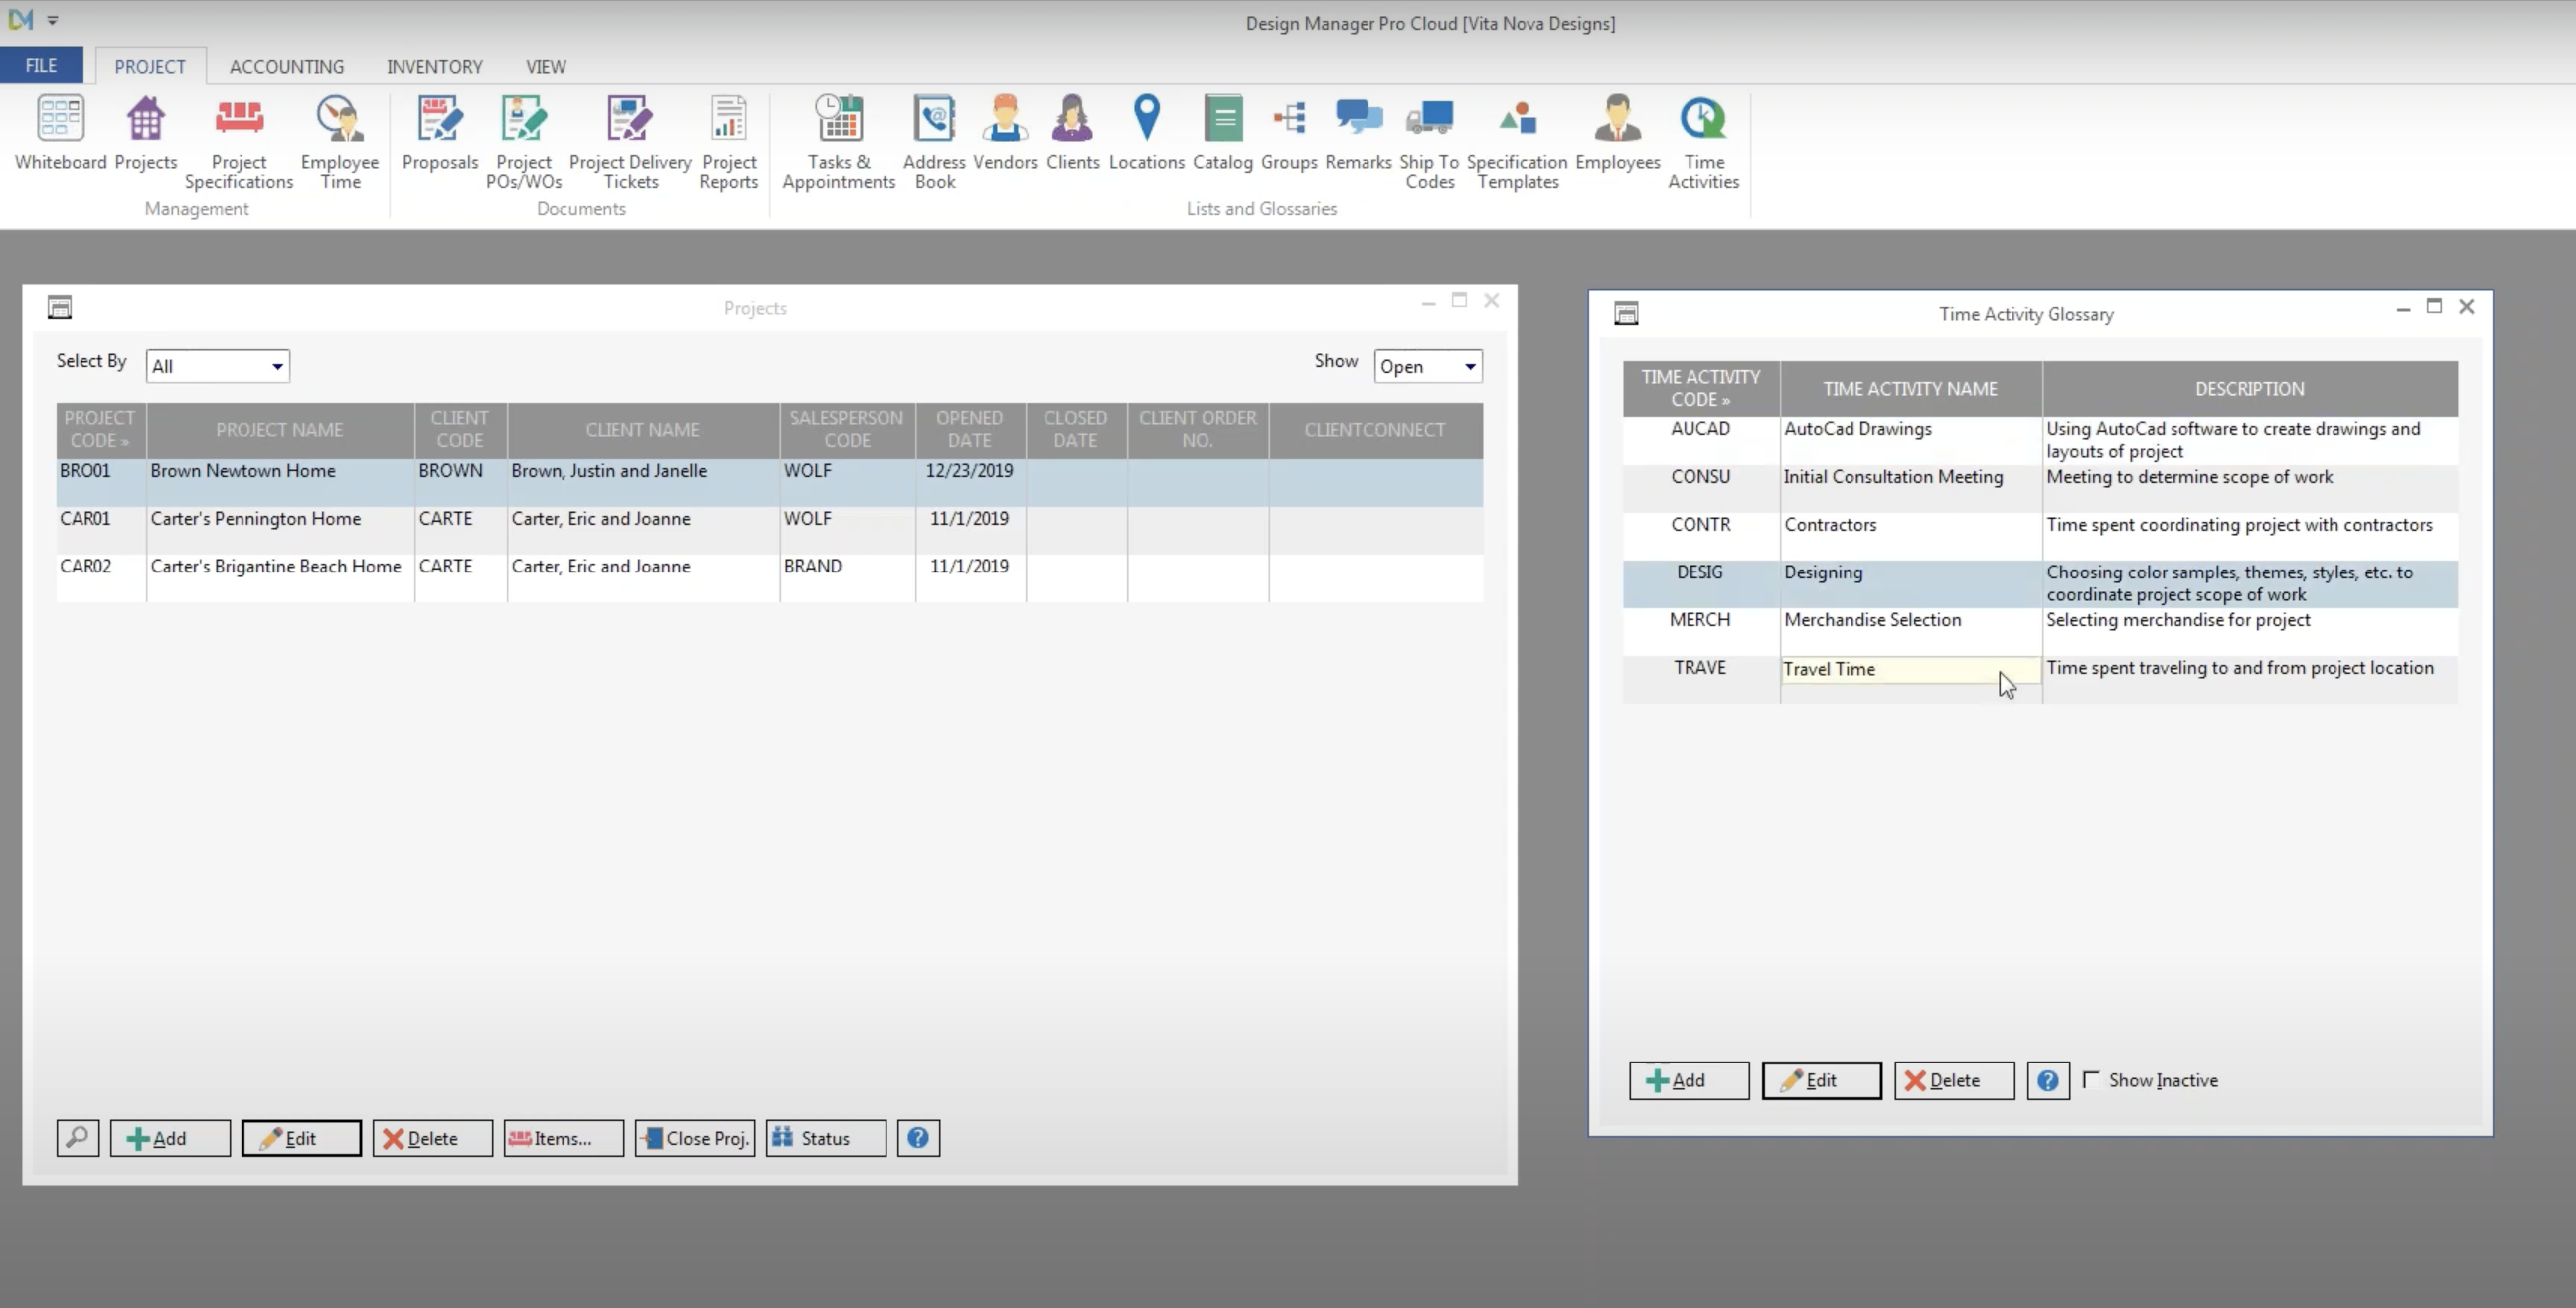 Within this menu, you can add and edit existing designations, where you can enter a description that will be displayed on client invoices (unless you choose to omit descriptions, which is an available customization). From this menu, you can also:
- Choose to always use the time billing rate of the employee assigned to the task in each individual instance,
- To always use a fixed rate for the task (to be entered in this menu)
- Or to use the rate entered within the menu only when on the employee’s expectations list, which is a tool to override the automatic functions you are configuring with a different rate where needed.
This is helpful if you want to standardize pricing for certain services across your firm, but customize billing rates for other services. The icon to the left of the “Time Activities” icon is the “Employees” icon where, under the “Time” tab, you can enter employee specific rates for each type of work you have pre-entered as a billing category and employee rate exceptions.
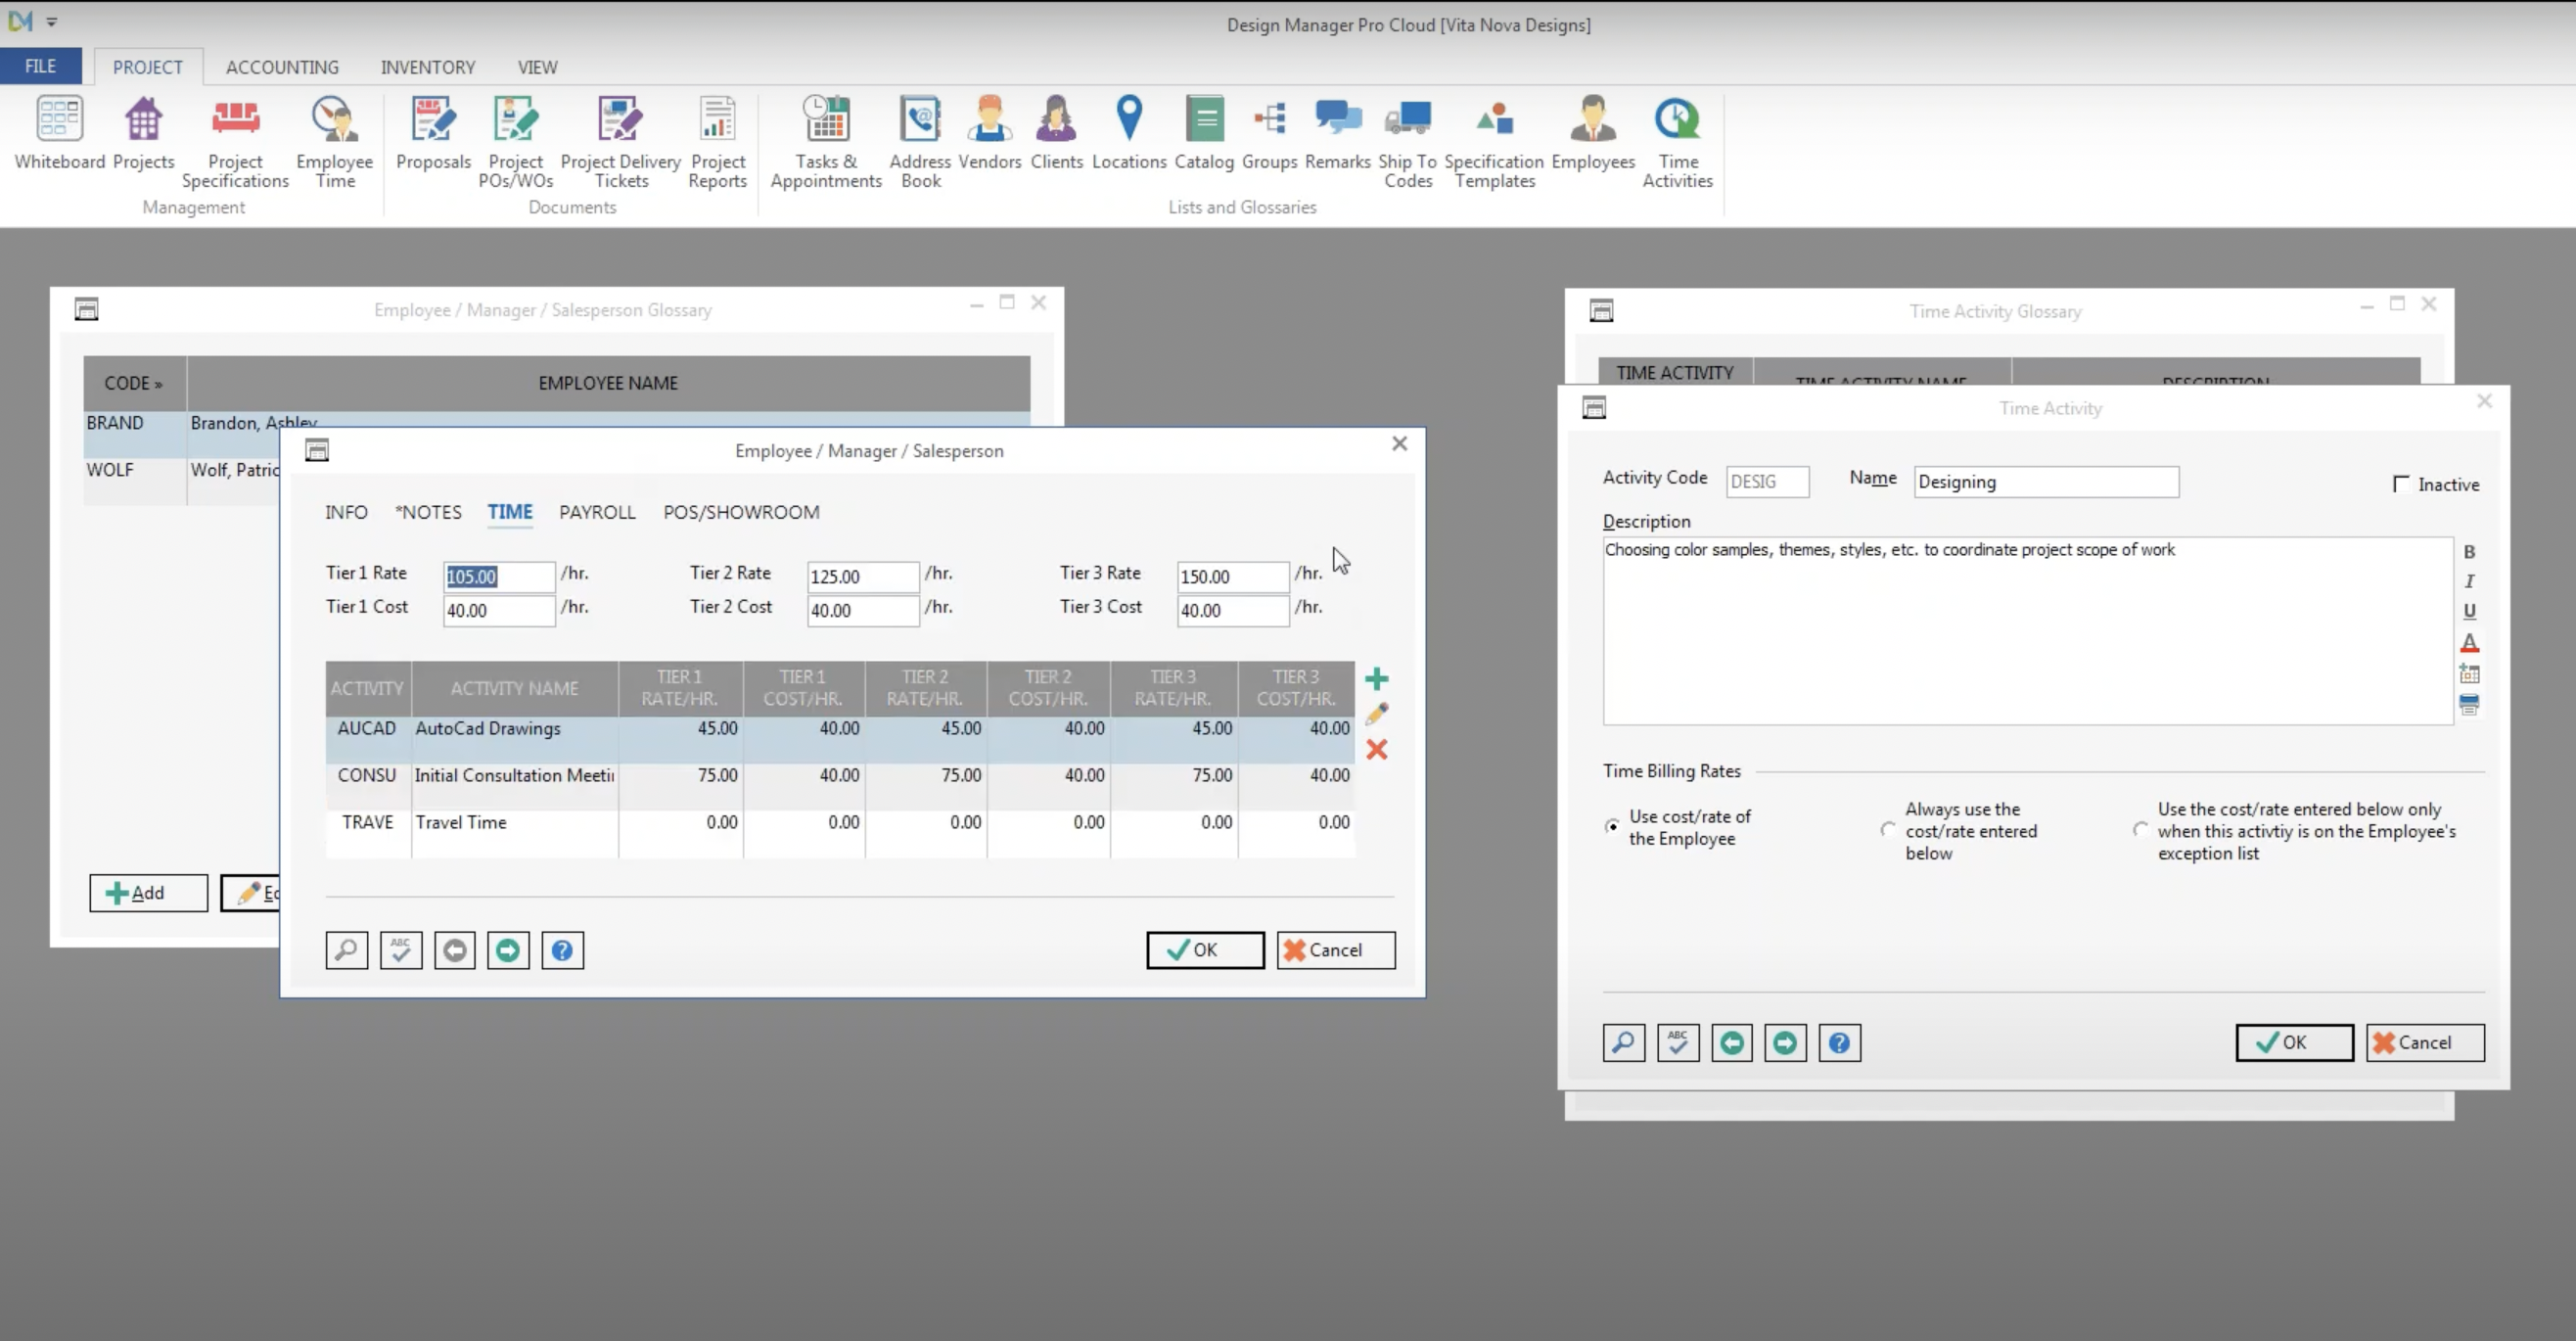 You can also enter the employee cost per hour for each tier of billing, which is not necessary for invoicing, but helpful to you as the business owner/manager to track your company’s profitability and ensure you are staying in the black.
Creating Time Entries Using the “Project Specifications” Menu
Now that your time billing categories and billing rates have been entered, let’s find out how to create time entries, first via the “Project Specifications” menu.
- Click the “Project Specifications” icon (the third from the left under the File tab of the Pro Cloud Menu).
- Simply enter the project name, select the project, and then click “New Item”.
- If you pre-program your “Remarks Glossary” to include the categories of time billing your company uses, you can select one of these categories to populate your new item.
- Also pre-enter “Time” as a location, so you can choose that from the location drop down menu.
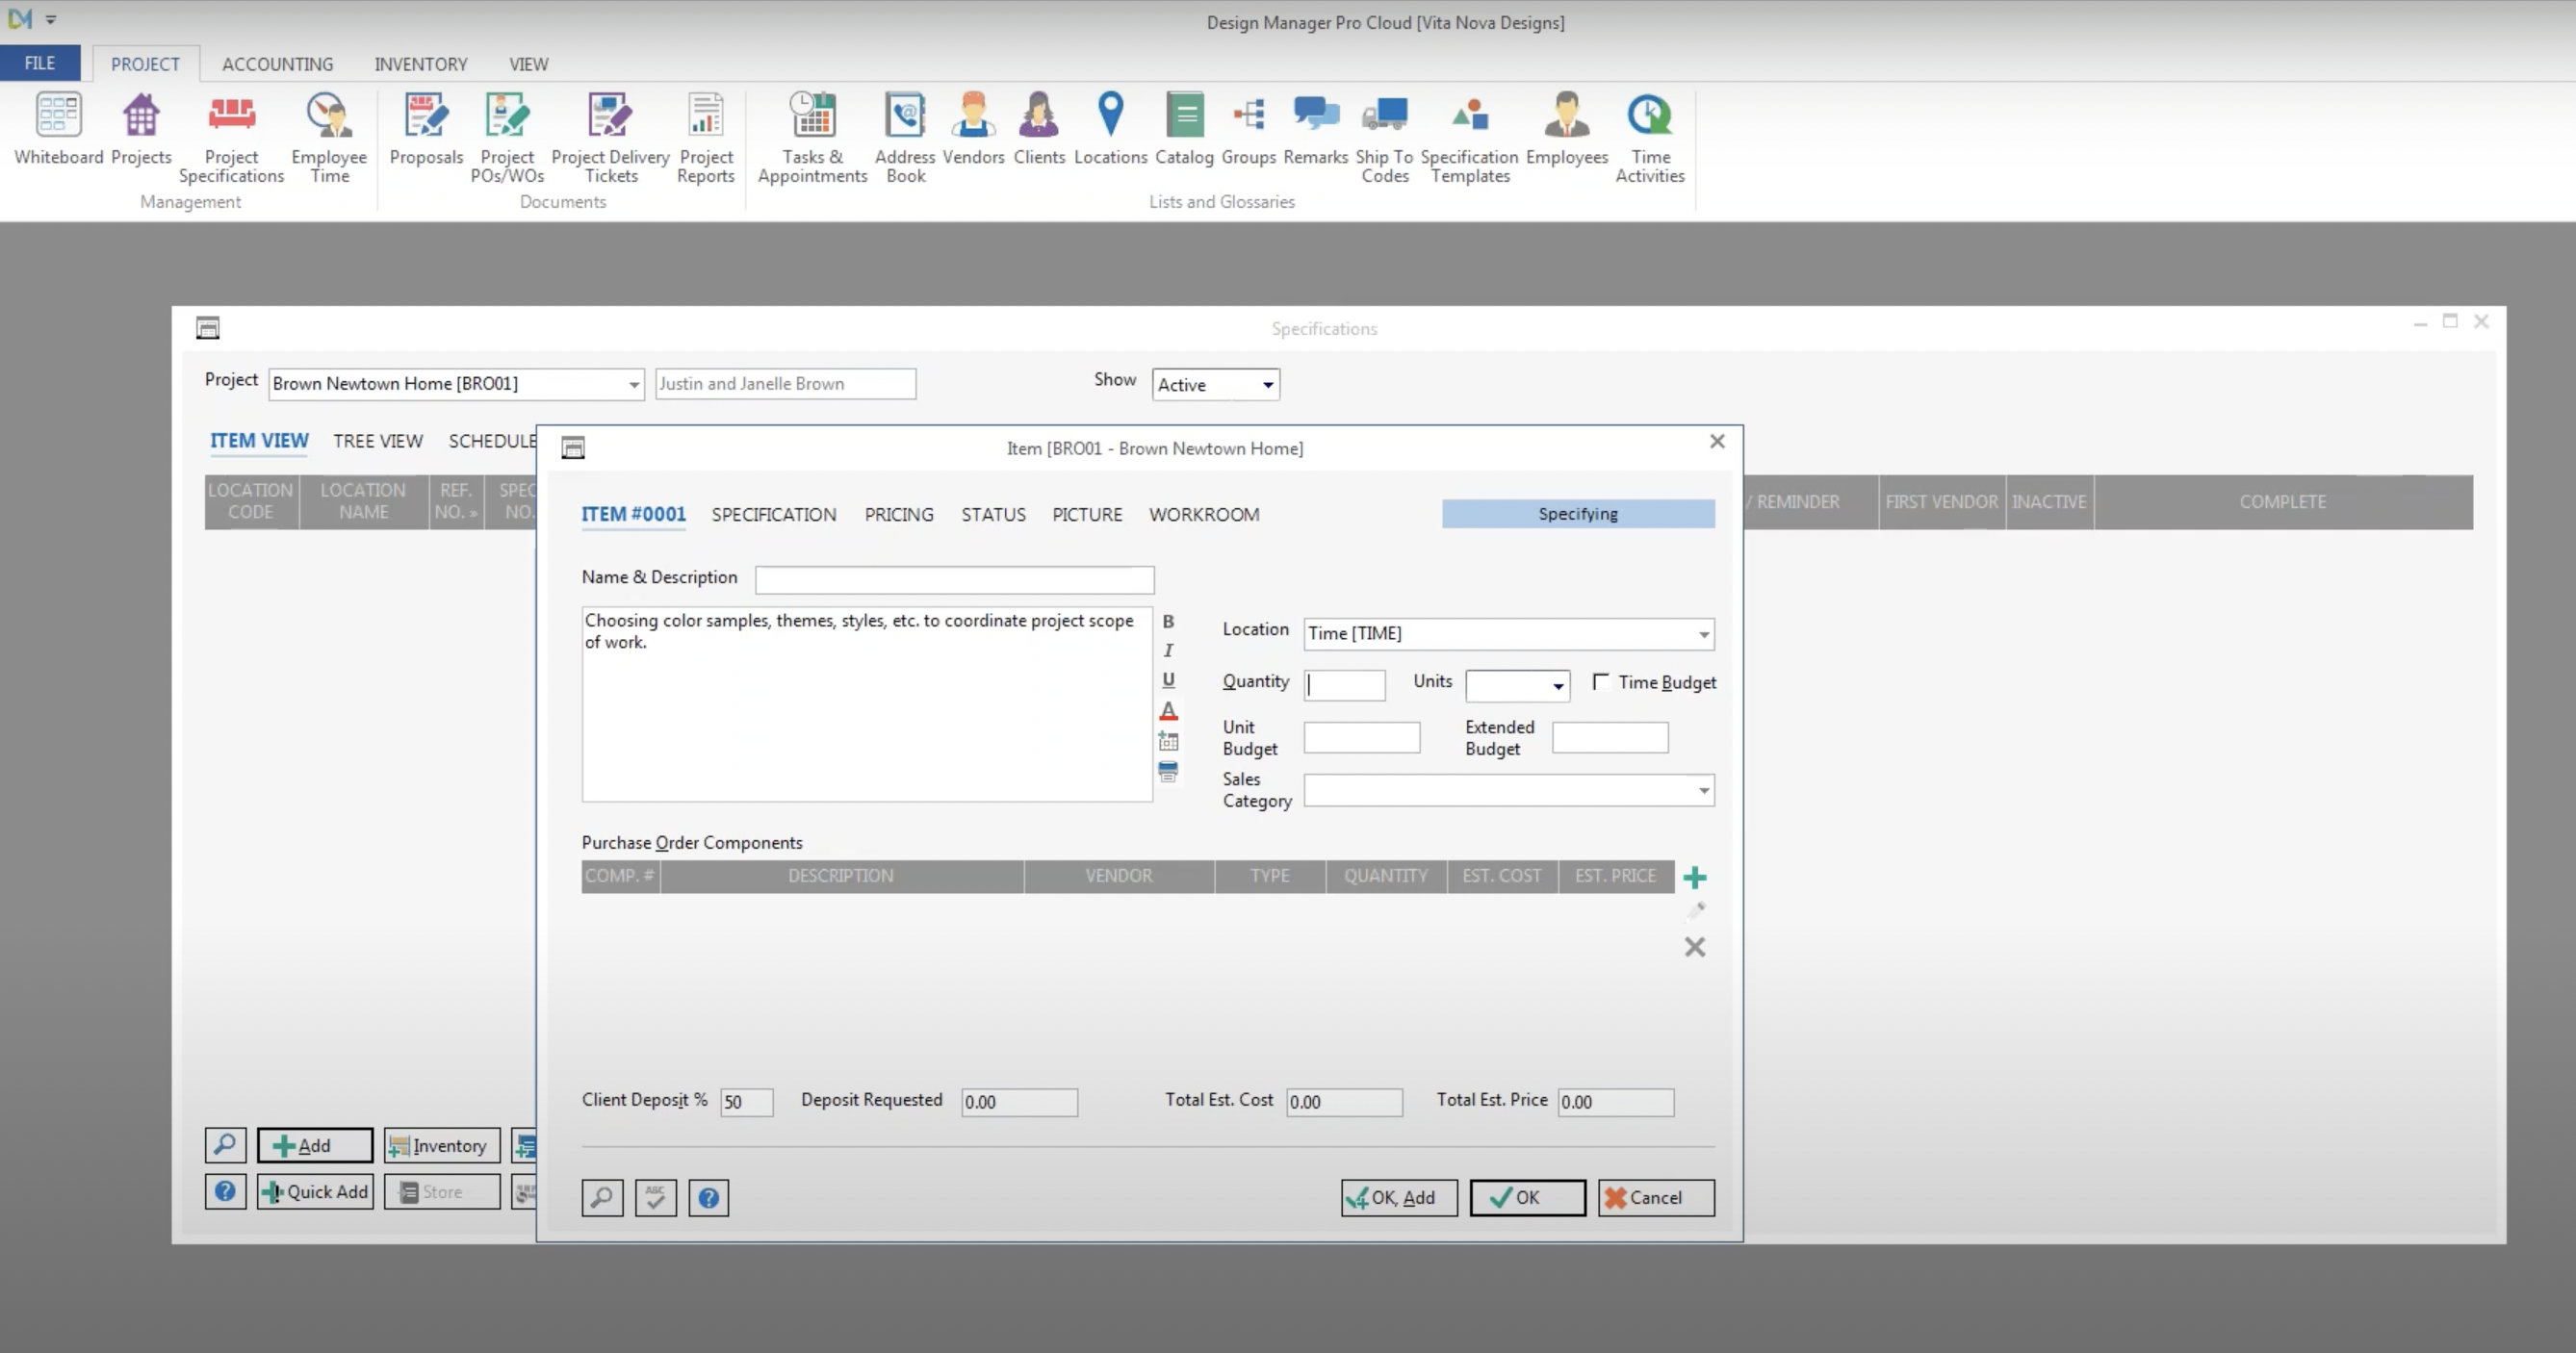
- Then click the “Add” button (the green plus sign) to open a new components menu. Within this menu, the description will copy over from the Item menu.
- For Type, choose “Time” from the drop-down menu, which will reconfigure the component menu to reflect the necessary fields for a time billing entry, such as an “Employee” and “Activity” field.
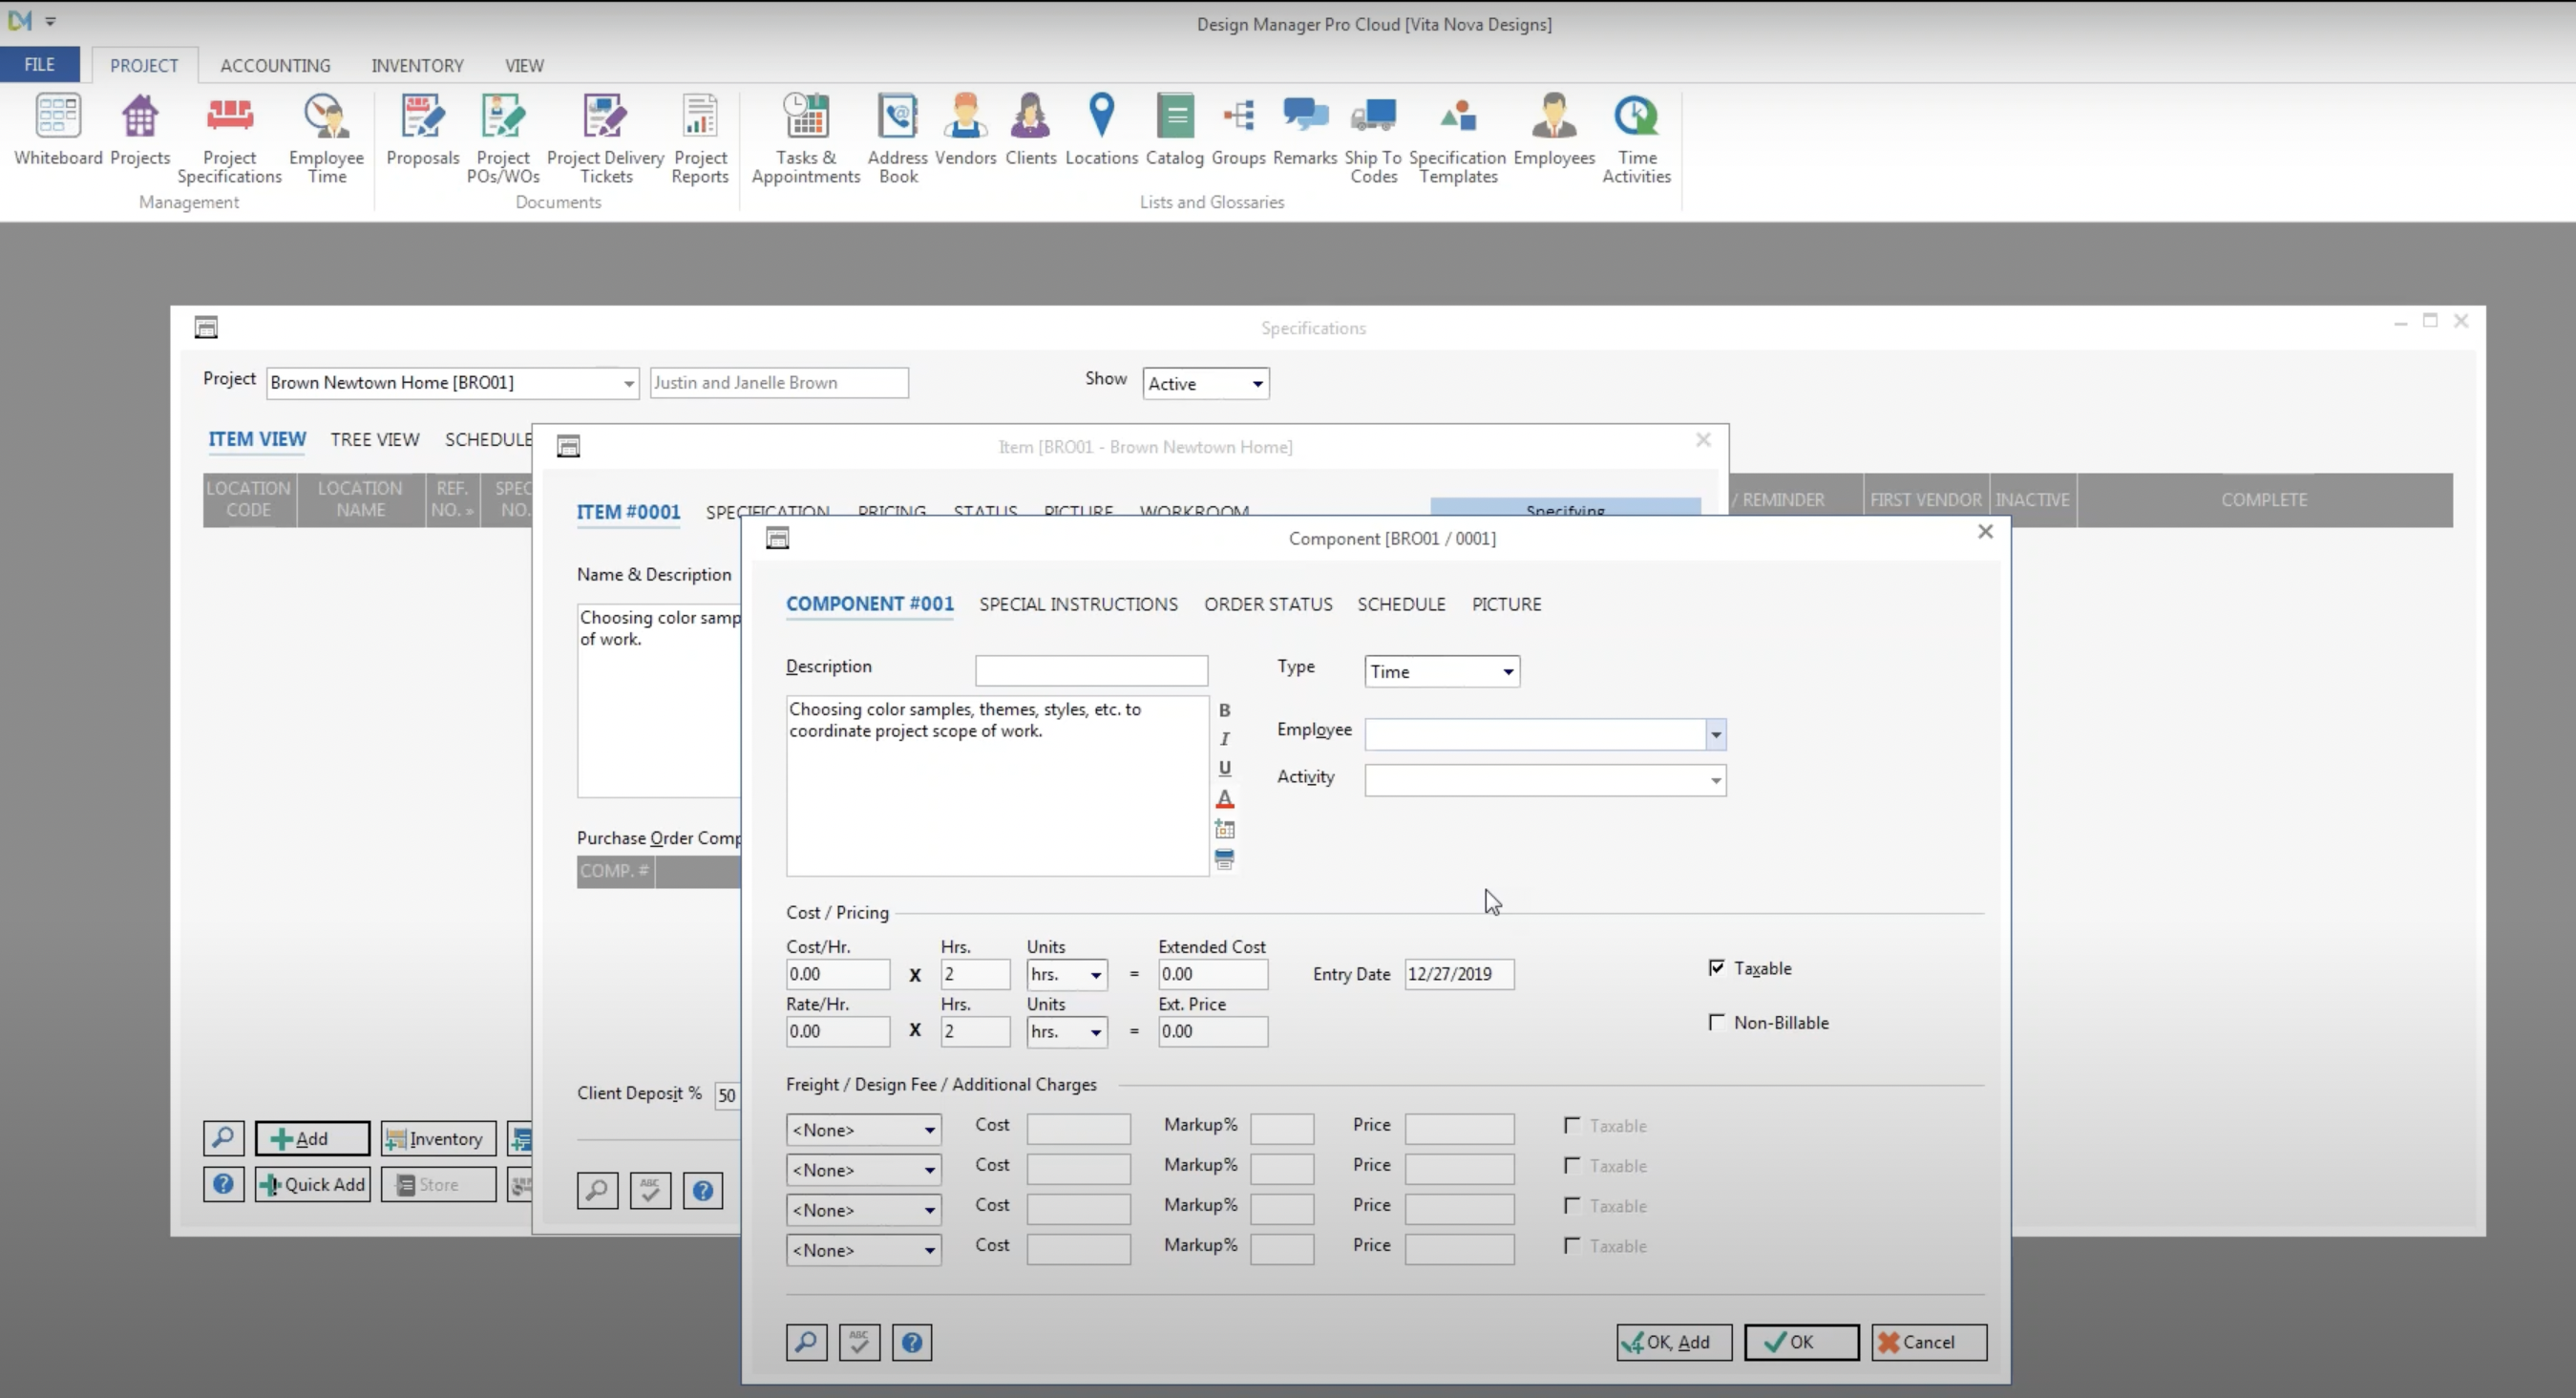
Based on what is selected in these two fields, Design Manager will auto-populate the remaining fields with your pre-entered billing information. Within this menu, you can indicate whether or not this time entry is billable, as well as whether this time is taxable or non-taxable.
To add multiple time entries, or components, to one Design Manager item, follow the same process:
- Choose “Add” under Project Specifications to begin the process of creating an “Item”.
- Enter a description and then choose “Time” from the drop down menu for Location.
- Just like in the last scenario, click the “Add” button to create a “Component” for this “Item”, and choose “Time” from the Type drop down menu and select the employee and activity.
- Then, if you choose “OK, Add” at the bottom right corner, you can continue to add “Components'' to the same entry, which is helpful for making invoicing efficient.
Each component can have unique classifications of billable and taxable. If a component is marked as non-billable, it will show up as zero cost to the client on the invoice, but the cost to the firm will still be recorded on the back end, per the data you have pre-entered for each employee/activity. Then, when invoicing the client, you can choose to show this item on a consolidated basis, or break out the details by component.
To see how these entries can appear on an invoice:
- Click the Accounting Tab at the top of your Pro Cloud Menu and then the “Client Invoices” icon.
- In the sub-menu, click “Add Invoice”.
- Choose a project from the drop down menu, which will then populate the window with all items that you have marked as needing to be invoiced.
- Check the boxes for the items you want to include, then click “OK”.
- In the next menu that will pop-up, Click “Print/Post” in the lower right hand corner. This will open a dialog box where you can choose document style, the ability to include pictures, and to select the printer. The first page will show the simplified invoice that consolidates components of entries. The second page will show the breakout of components.
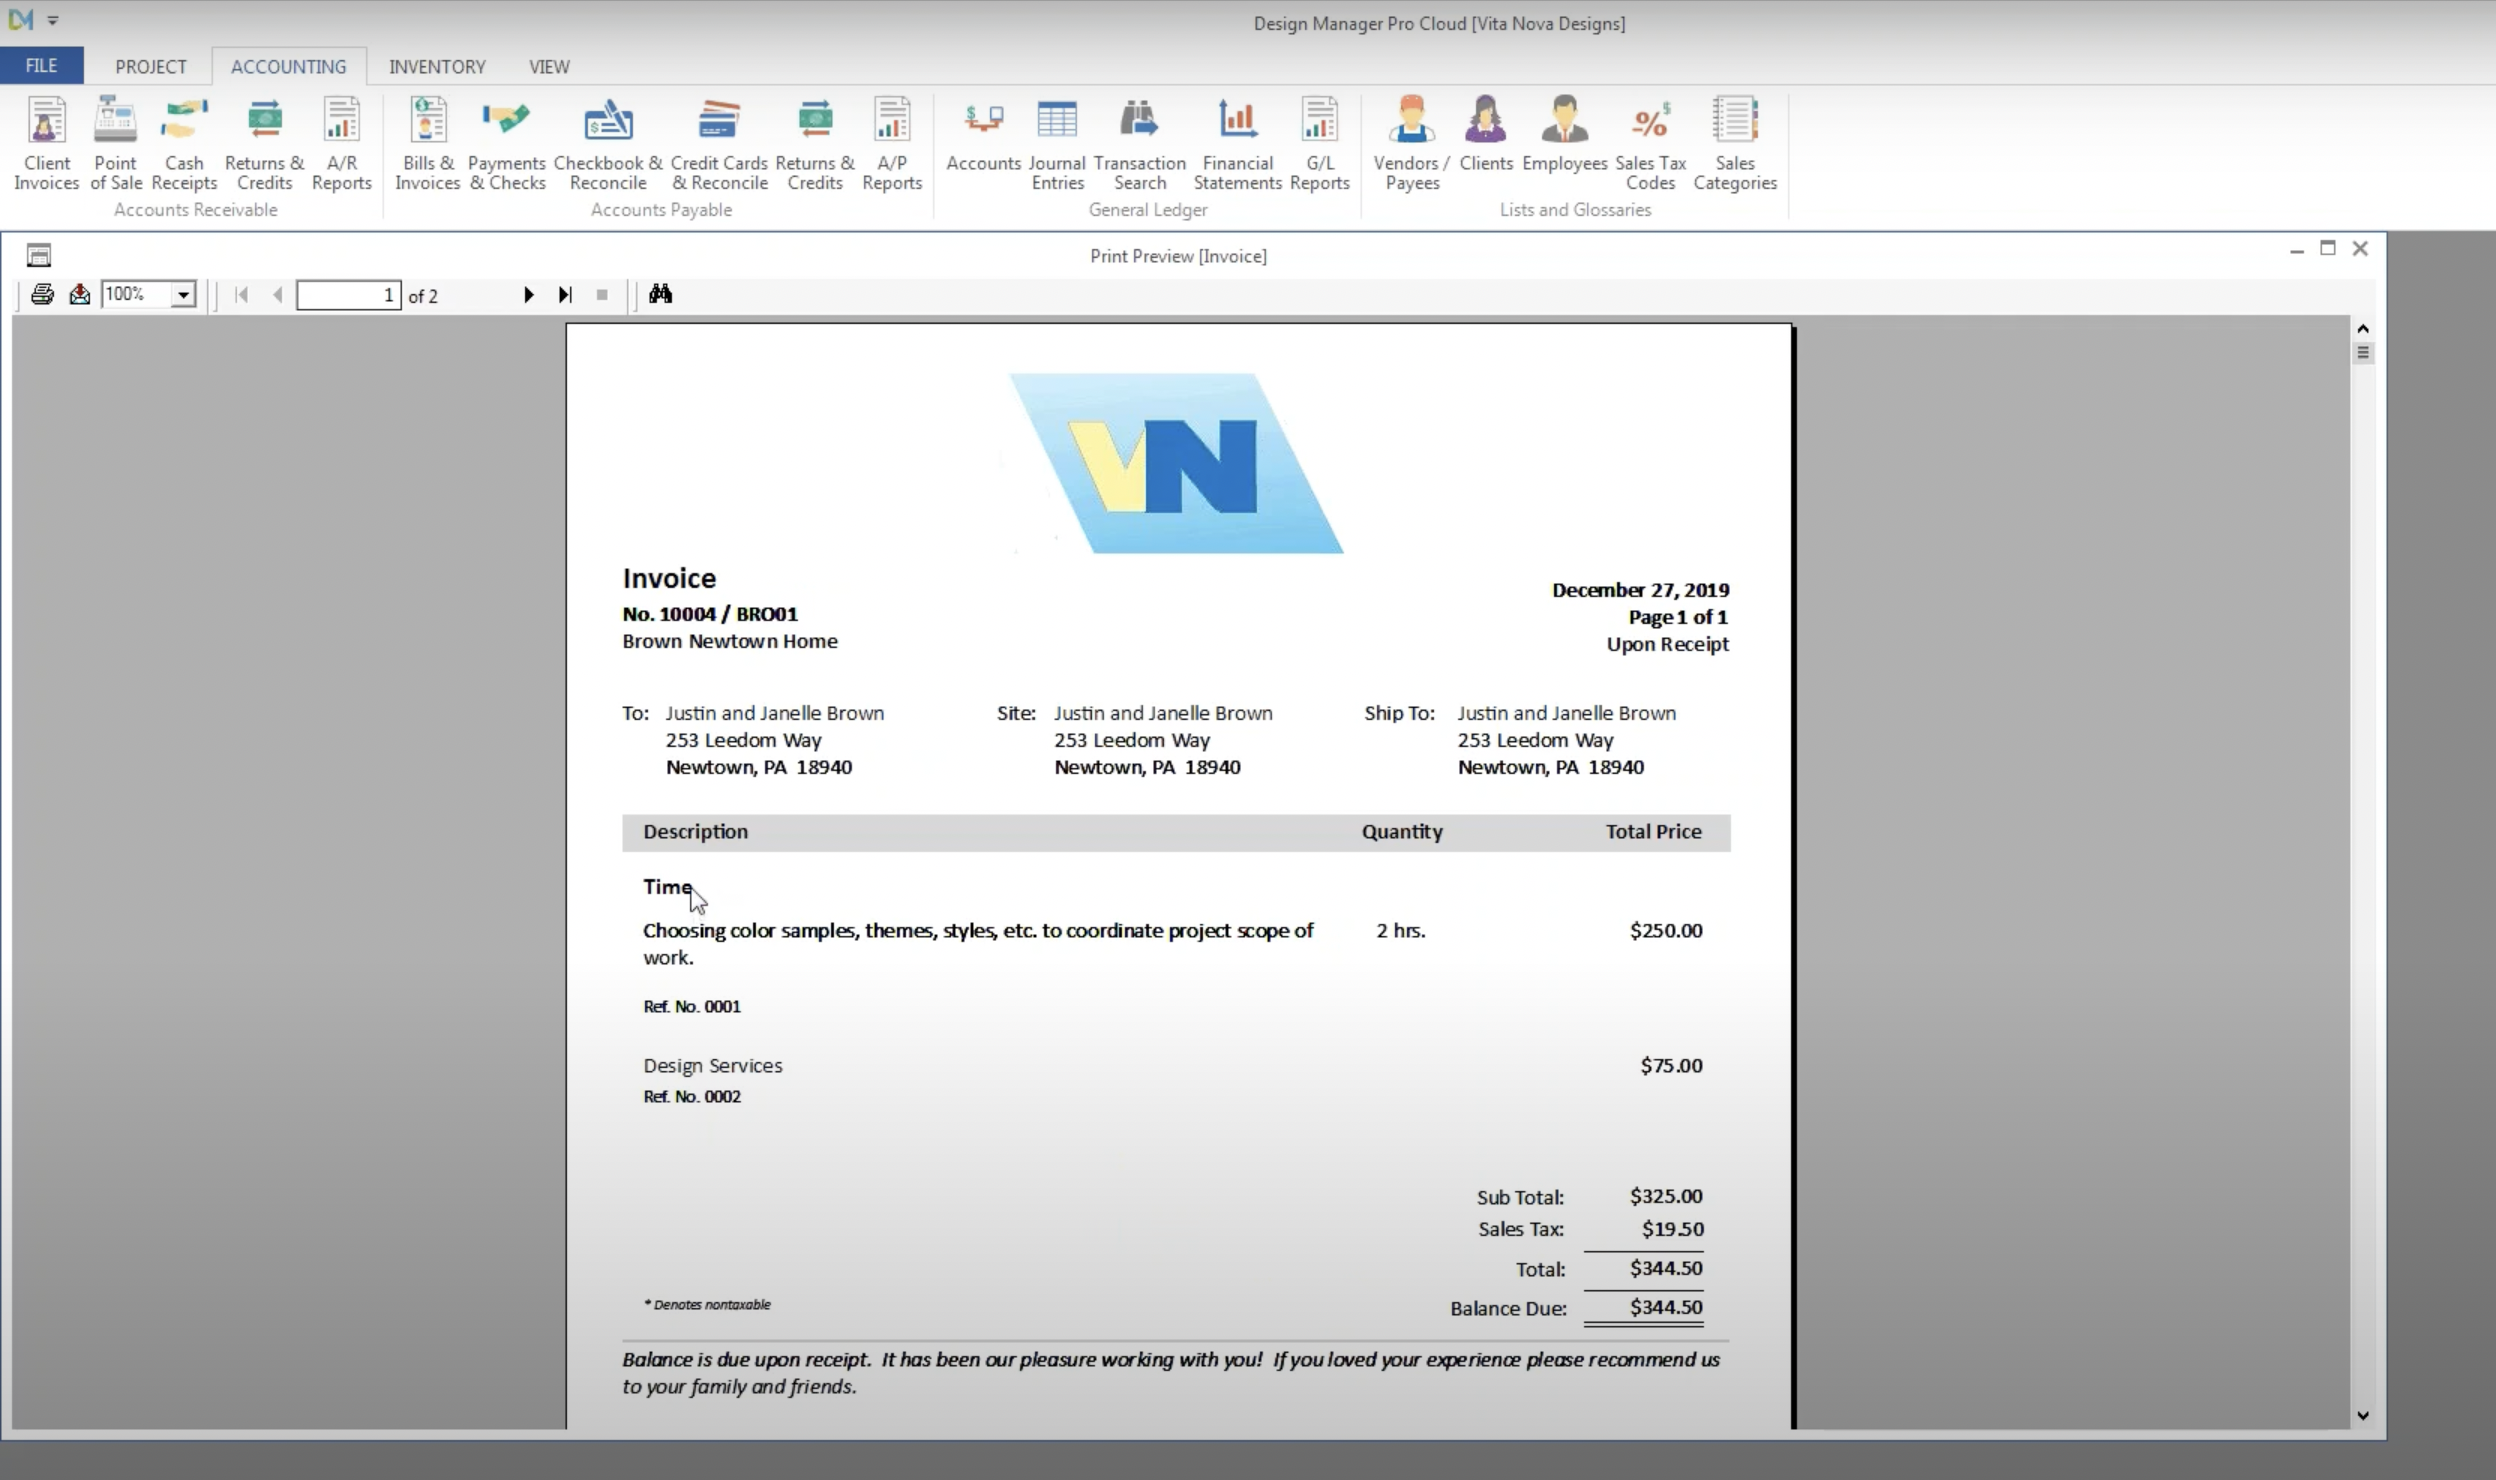
(Page 1 shows the invoice where the “Design Services” entry is consolidated)
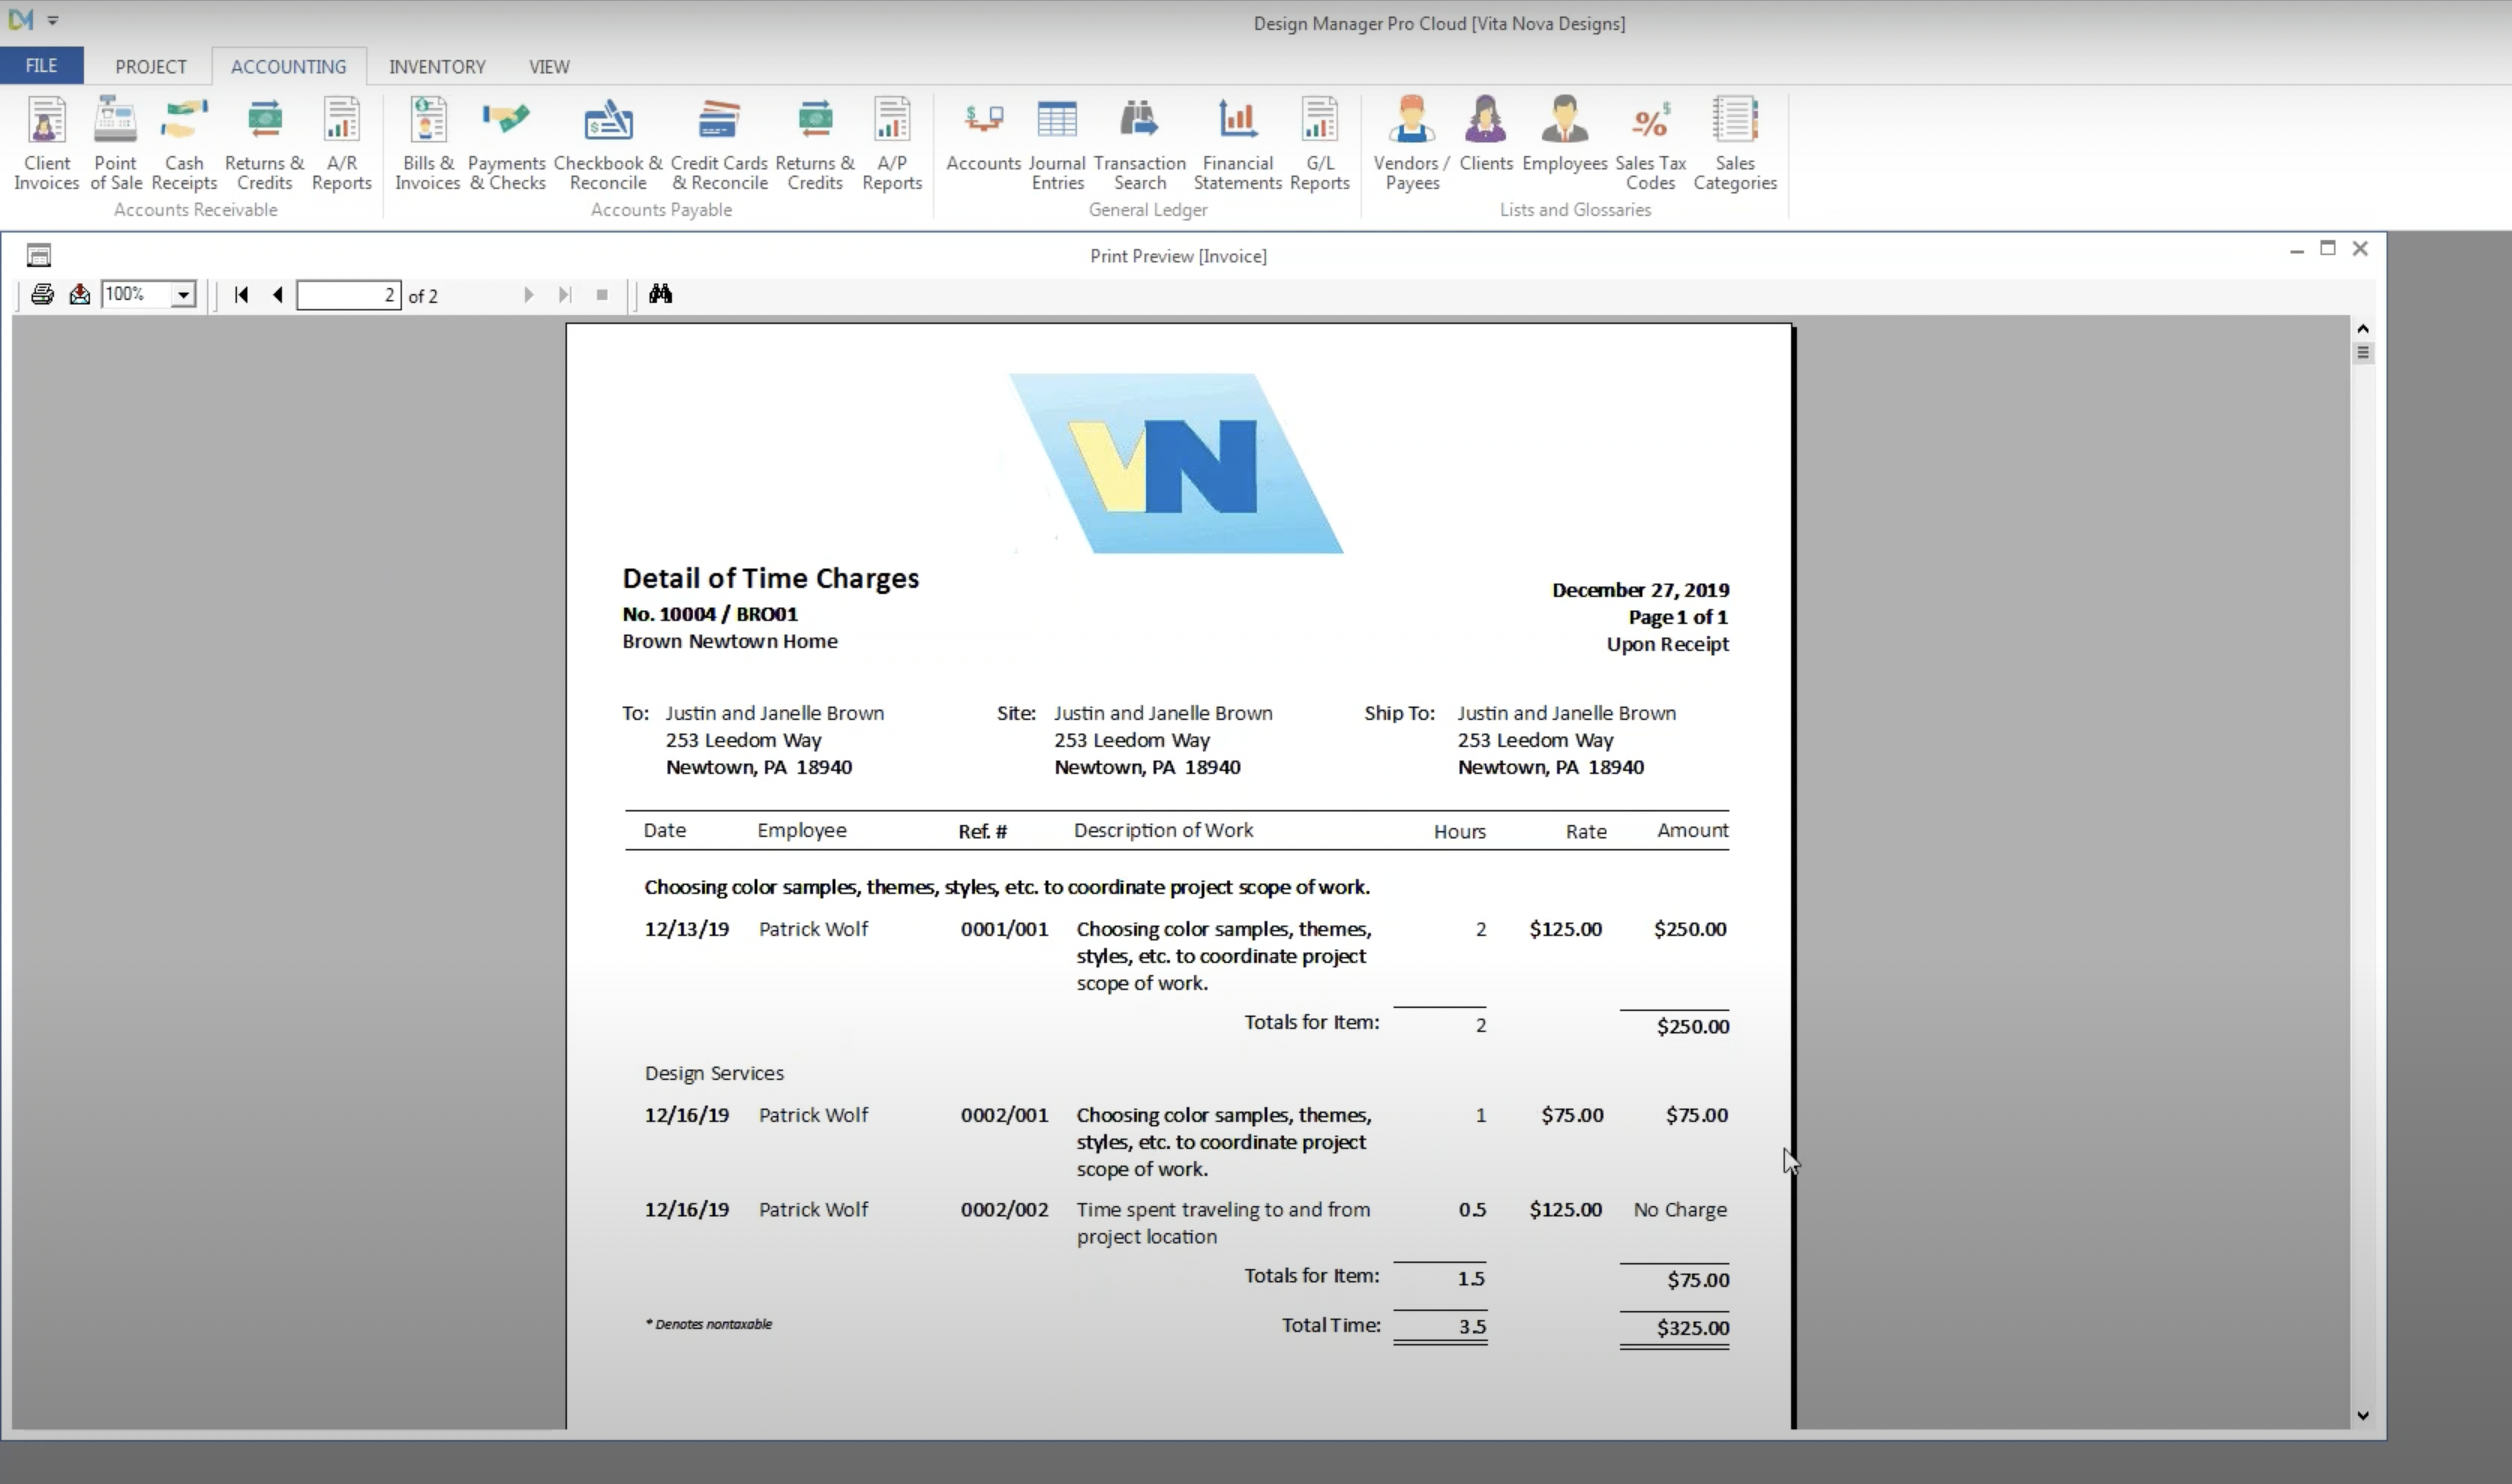
(Page 2 shows the invoice where the “Design Services” entry is broken out by component)
Creating Time Entries Using the “Employee Time” Menu
Another way to enter time for billing is to use the “Employee Time” menu.
- Click the “Employee Time” icon, the fourth from the left on the menu under the “File” tab within Pro Cloud.
There are a few different ways to view and enter time using this menu. The first is by employee, where you select an employee from the drop down menu. You can customize Design Manager to automatically populate a particular employee’s name or to only allow time entries to be made for certain employees.
You can also make time entries by project by entering the project code, which is helpful if you have several employees working on the same project related tasks. You can use the date icons, or set a range of dates for which you want to see time entry data.
To add a new time entry, either choose the “By Employee'' icon, or the “By Project” icon, and then “Add”, which is at the bottom left of the sub-menu. From there, select the project or employee, the activity, from which point the pricing information will auto-populate.
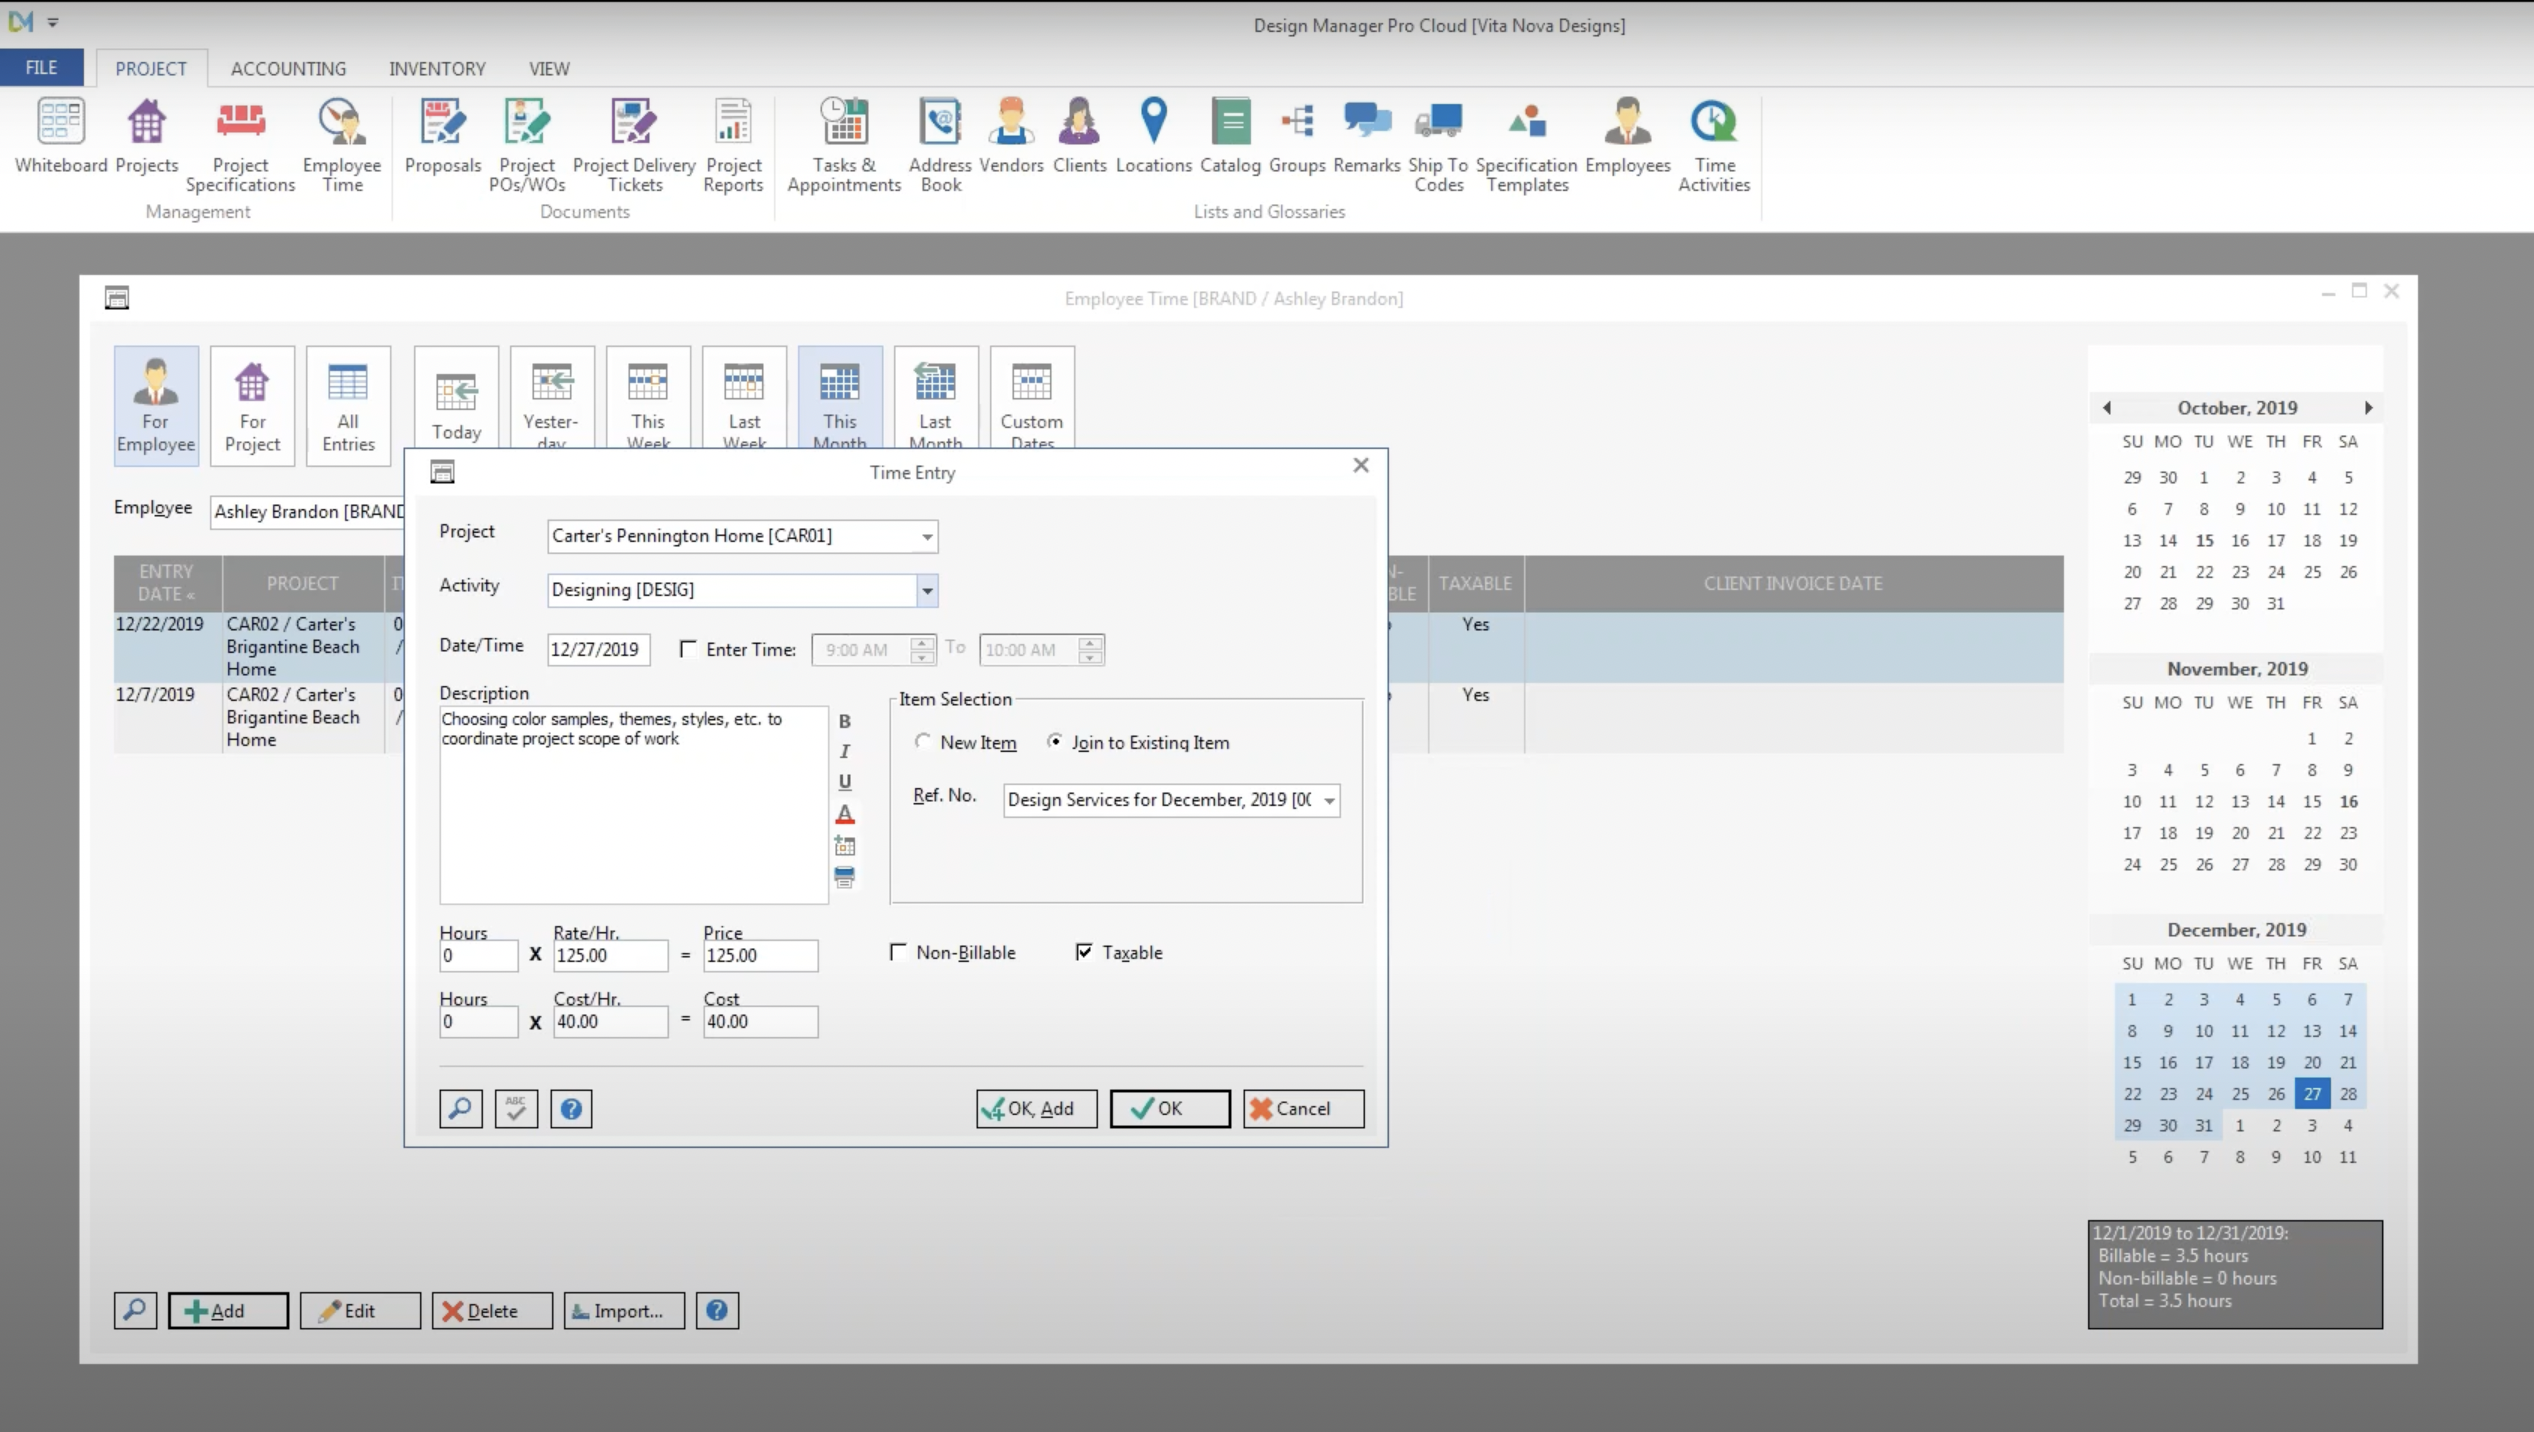
You will also see “Item Selection” as part of this menu.
- “Item Selection” allows you to create the time entry as new and independent of any other items, or to join to an existing item.
- If you select, “Join to Existing Item,” the “Ref. No.” drop down menu will show the existing time entries you have already created for that project.
- Click “OK” to finish adding the item.
- You can opt out of the ability to choose “Item Selection” for a particular project via the Project Specifications menu. This may be helpful if you have junior employees who are less familiar with Design Manager, as it eliminates the possibility of deviating from your preferred procedures.
Invoicing for time entries made through the “Employee TIme'' system works exactly the same way as it does for making entries through the “Project Specifications” menu.
- Click the Accounting tab at the top of the Pro Cloud menu, as we did before, and then the “Client Invoices'' icon, which is the first icon on the left.
- From there, follow the same process as covered above.
Time Budgeting in Design Manager
You can use Design Manager’s time entry functions to budget time, which is a great way to estimate the value of your time over the course of a project.
- By way of the “Project Specifications” menu, just create a new item, called “Proposed time budget,” for example.
- Enter “time” as the location and input your estimated metrics such as range of time, number of hours, and pricing.
- Click the checkbox next to “Time Budget” and then fill in your estimated details.
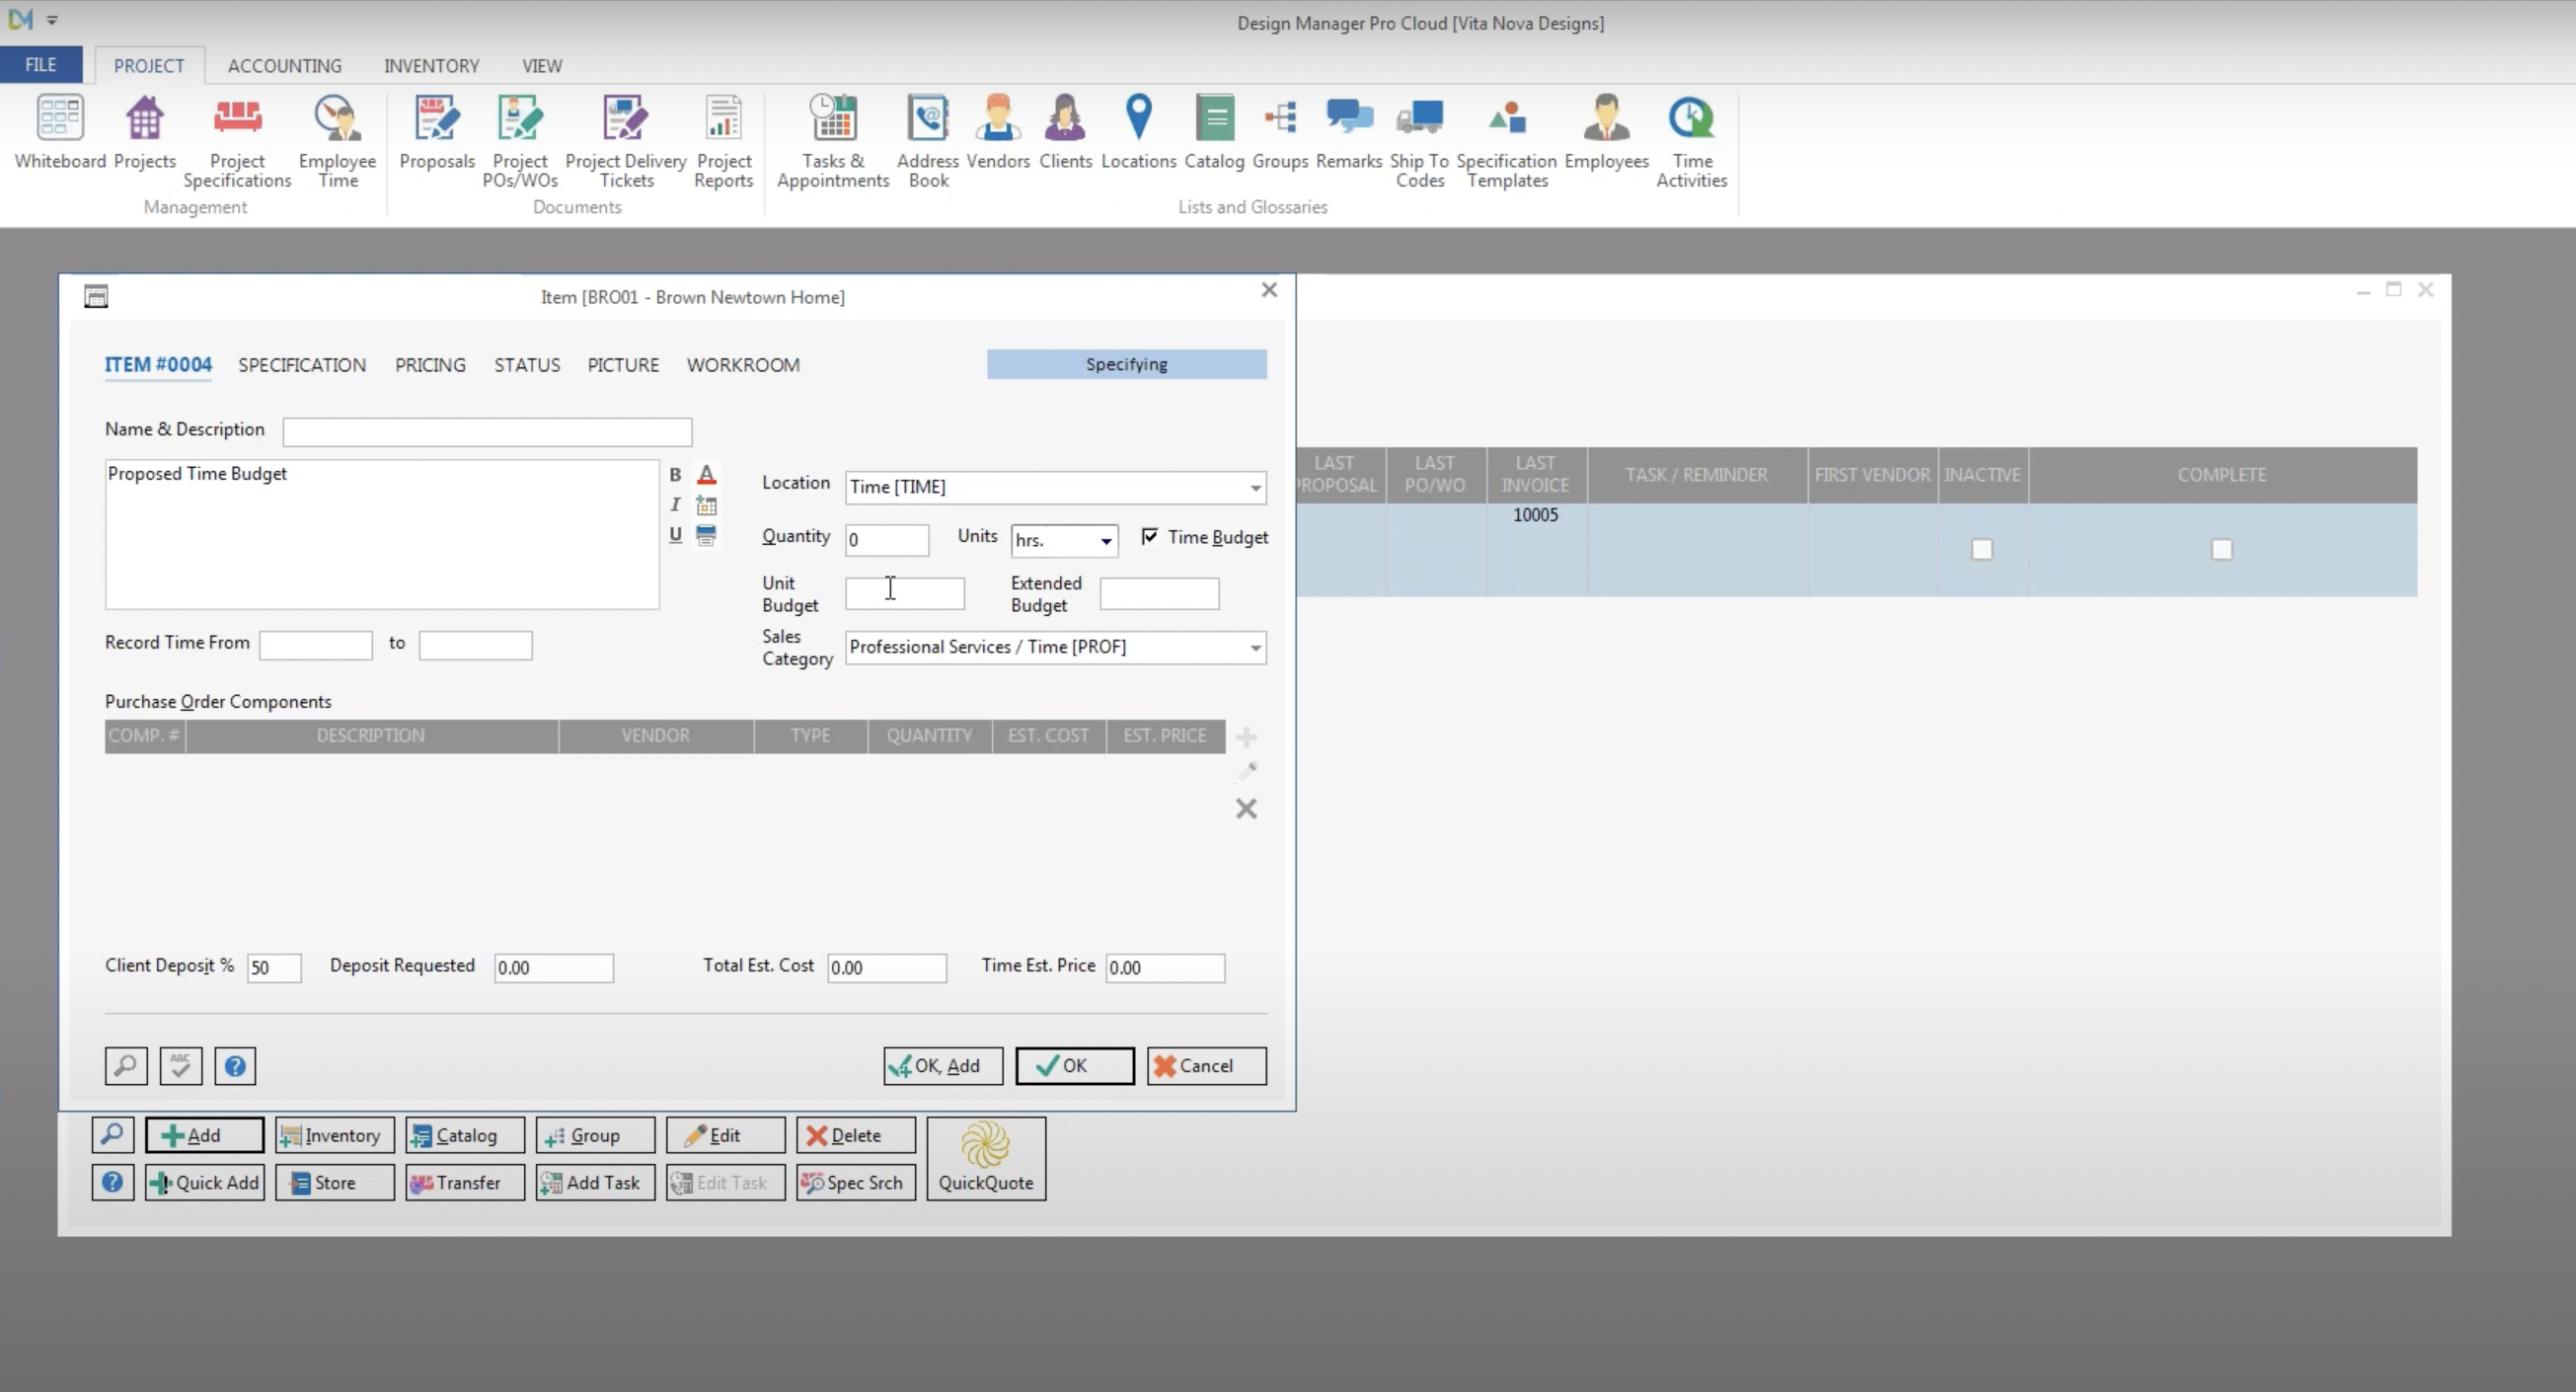
One you create the this item as “Proposed Time Budget”, you can then add items to it via the “Employee Activity” menu by selecting the “Add to Existing Item” option and then choosing “Proposed Time Budget” as the Item to you are joining new information to.
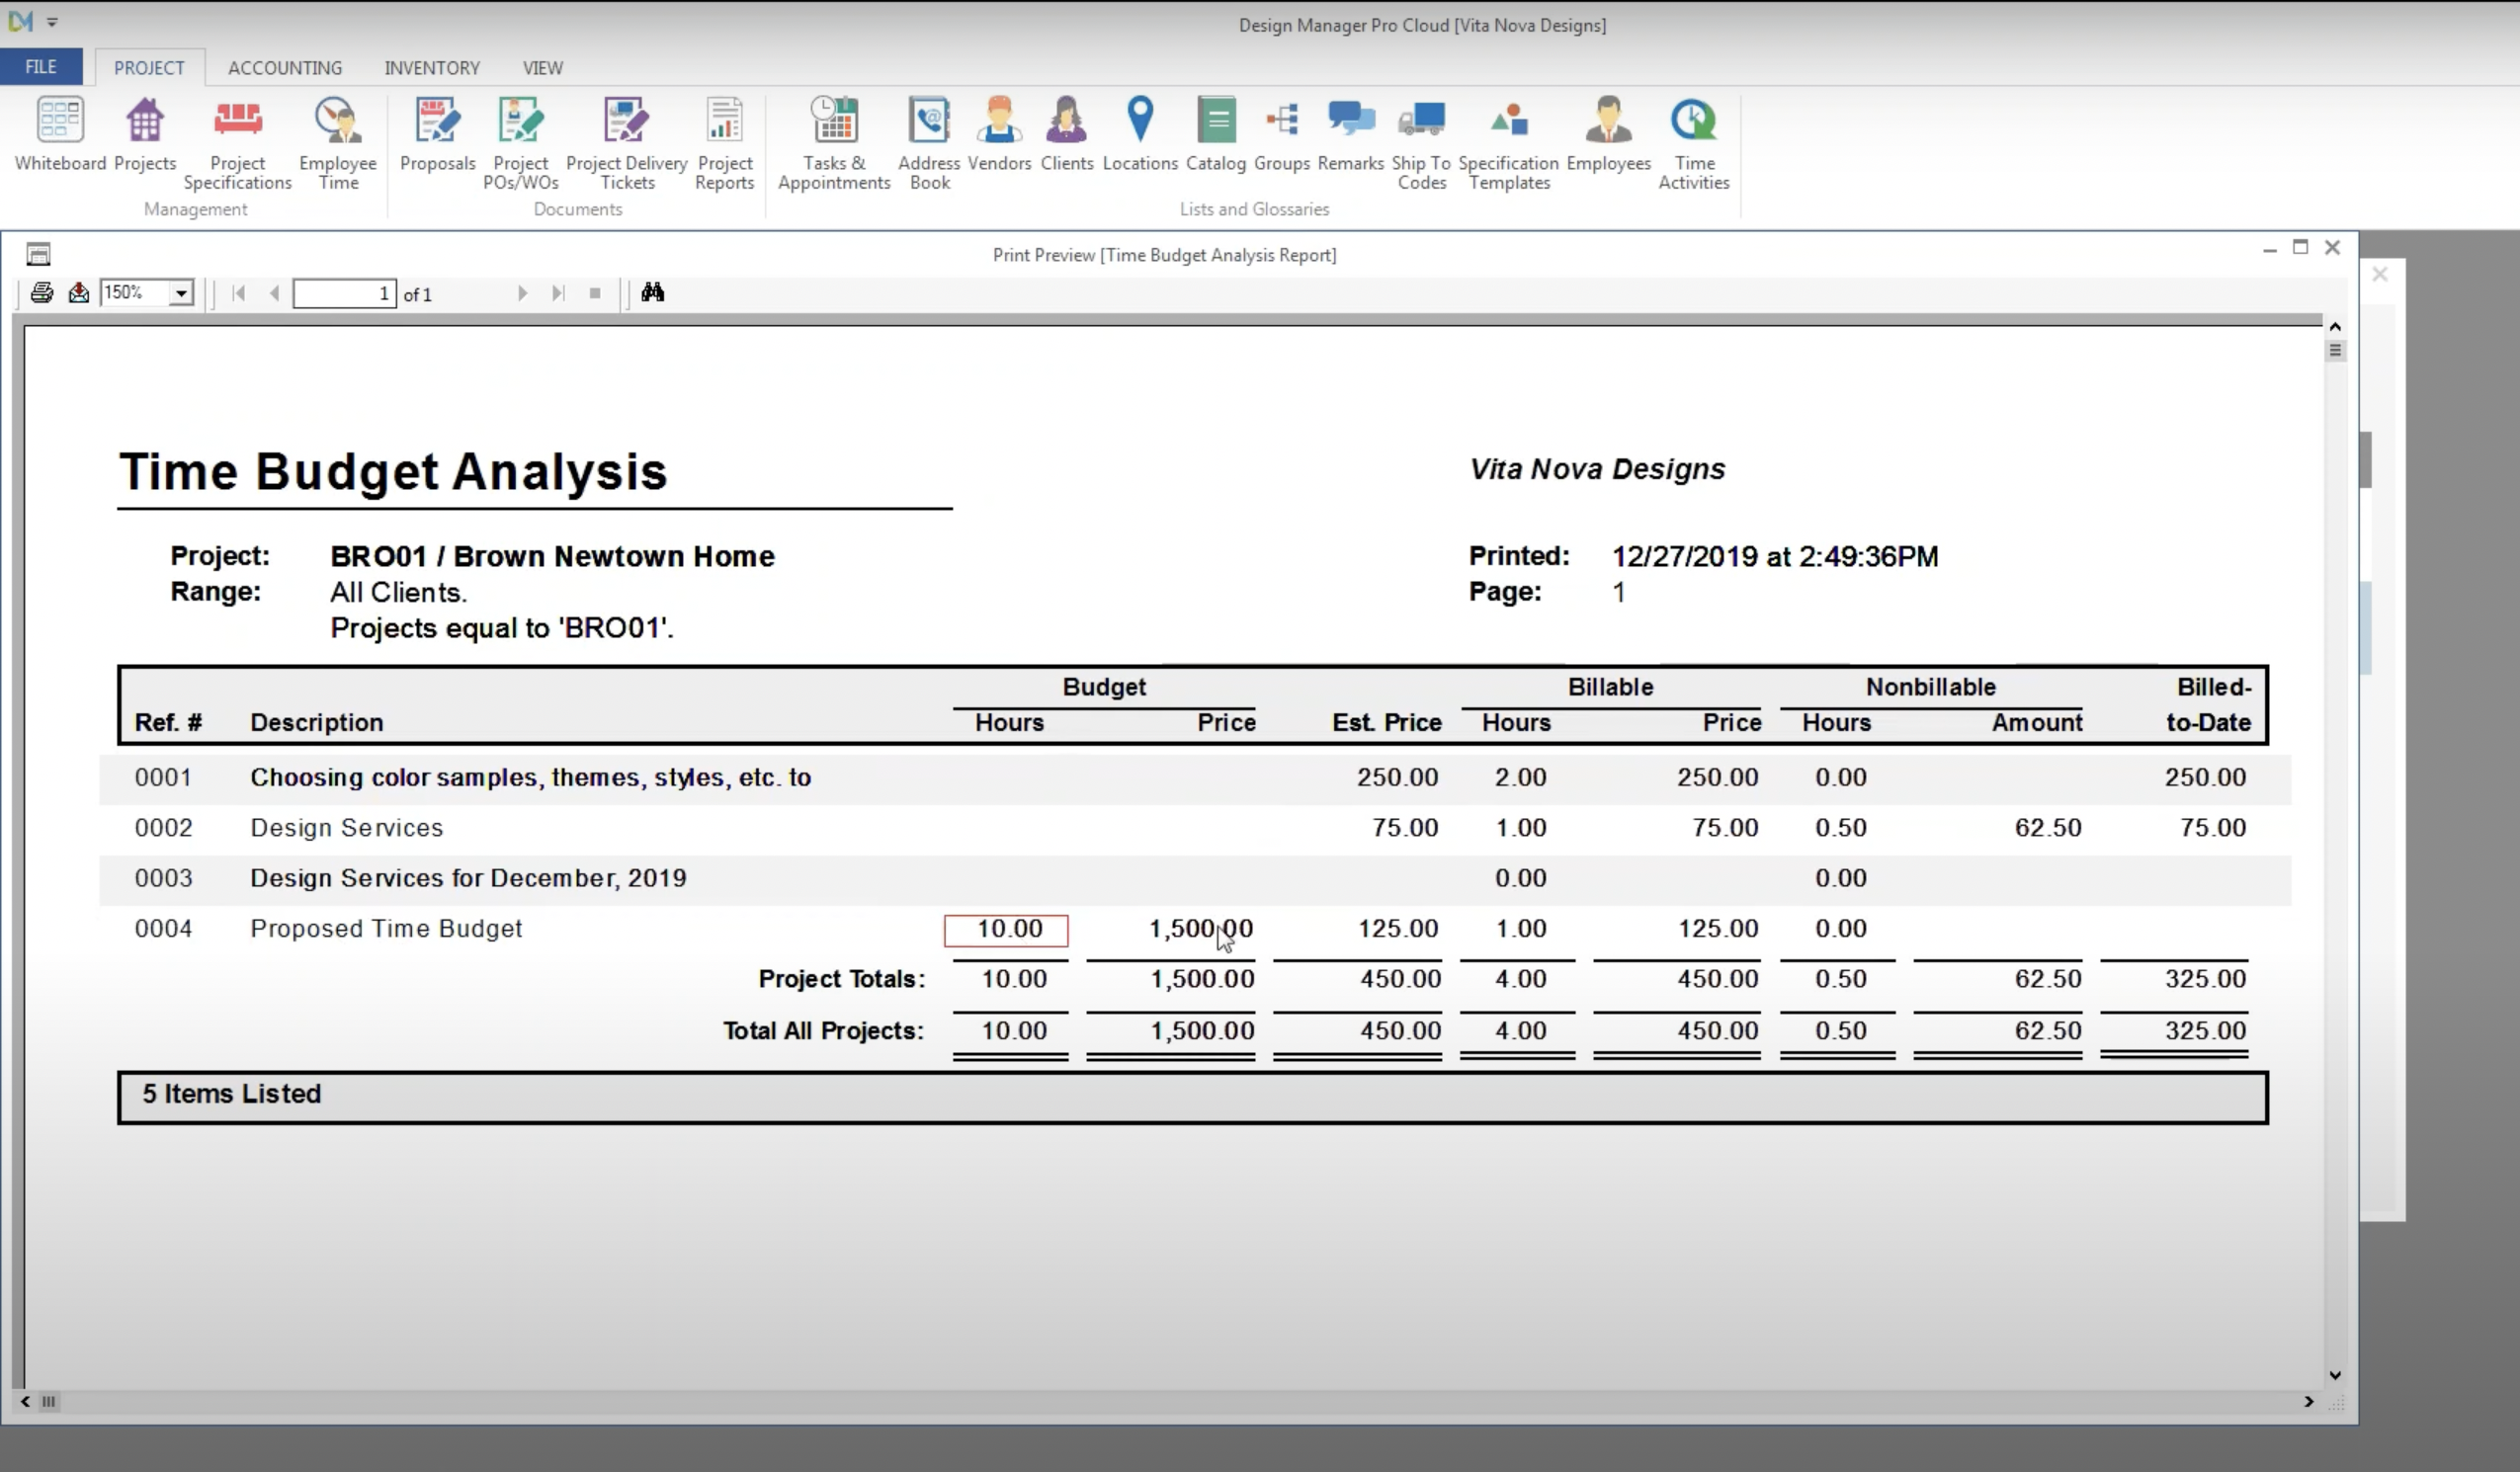
Using this budgeting feature will create a forecast you can use for internal purposes, or to charge clients in advance. To compare your forecast to the actual progression of your project, click the “Project Reports” icon (8th from the left), scroll down to “Time Billing Reports”, then choose “Time Budget” Analysis.
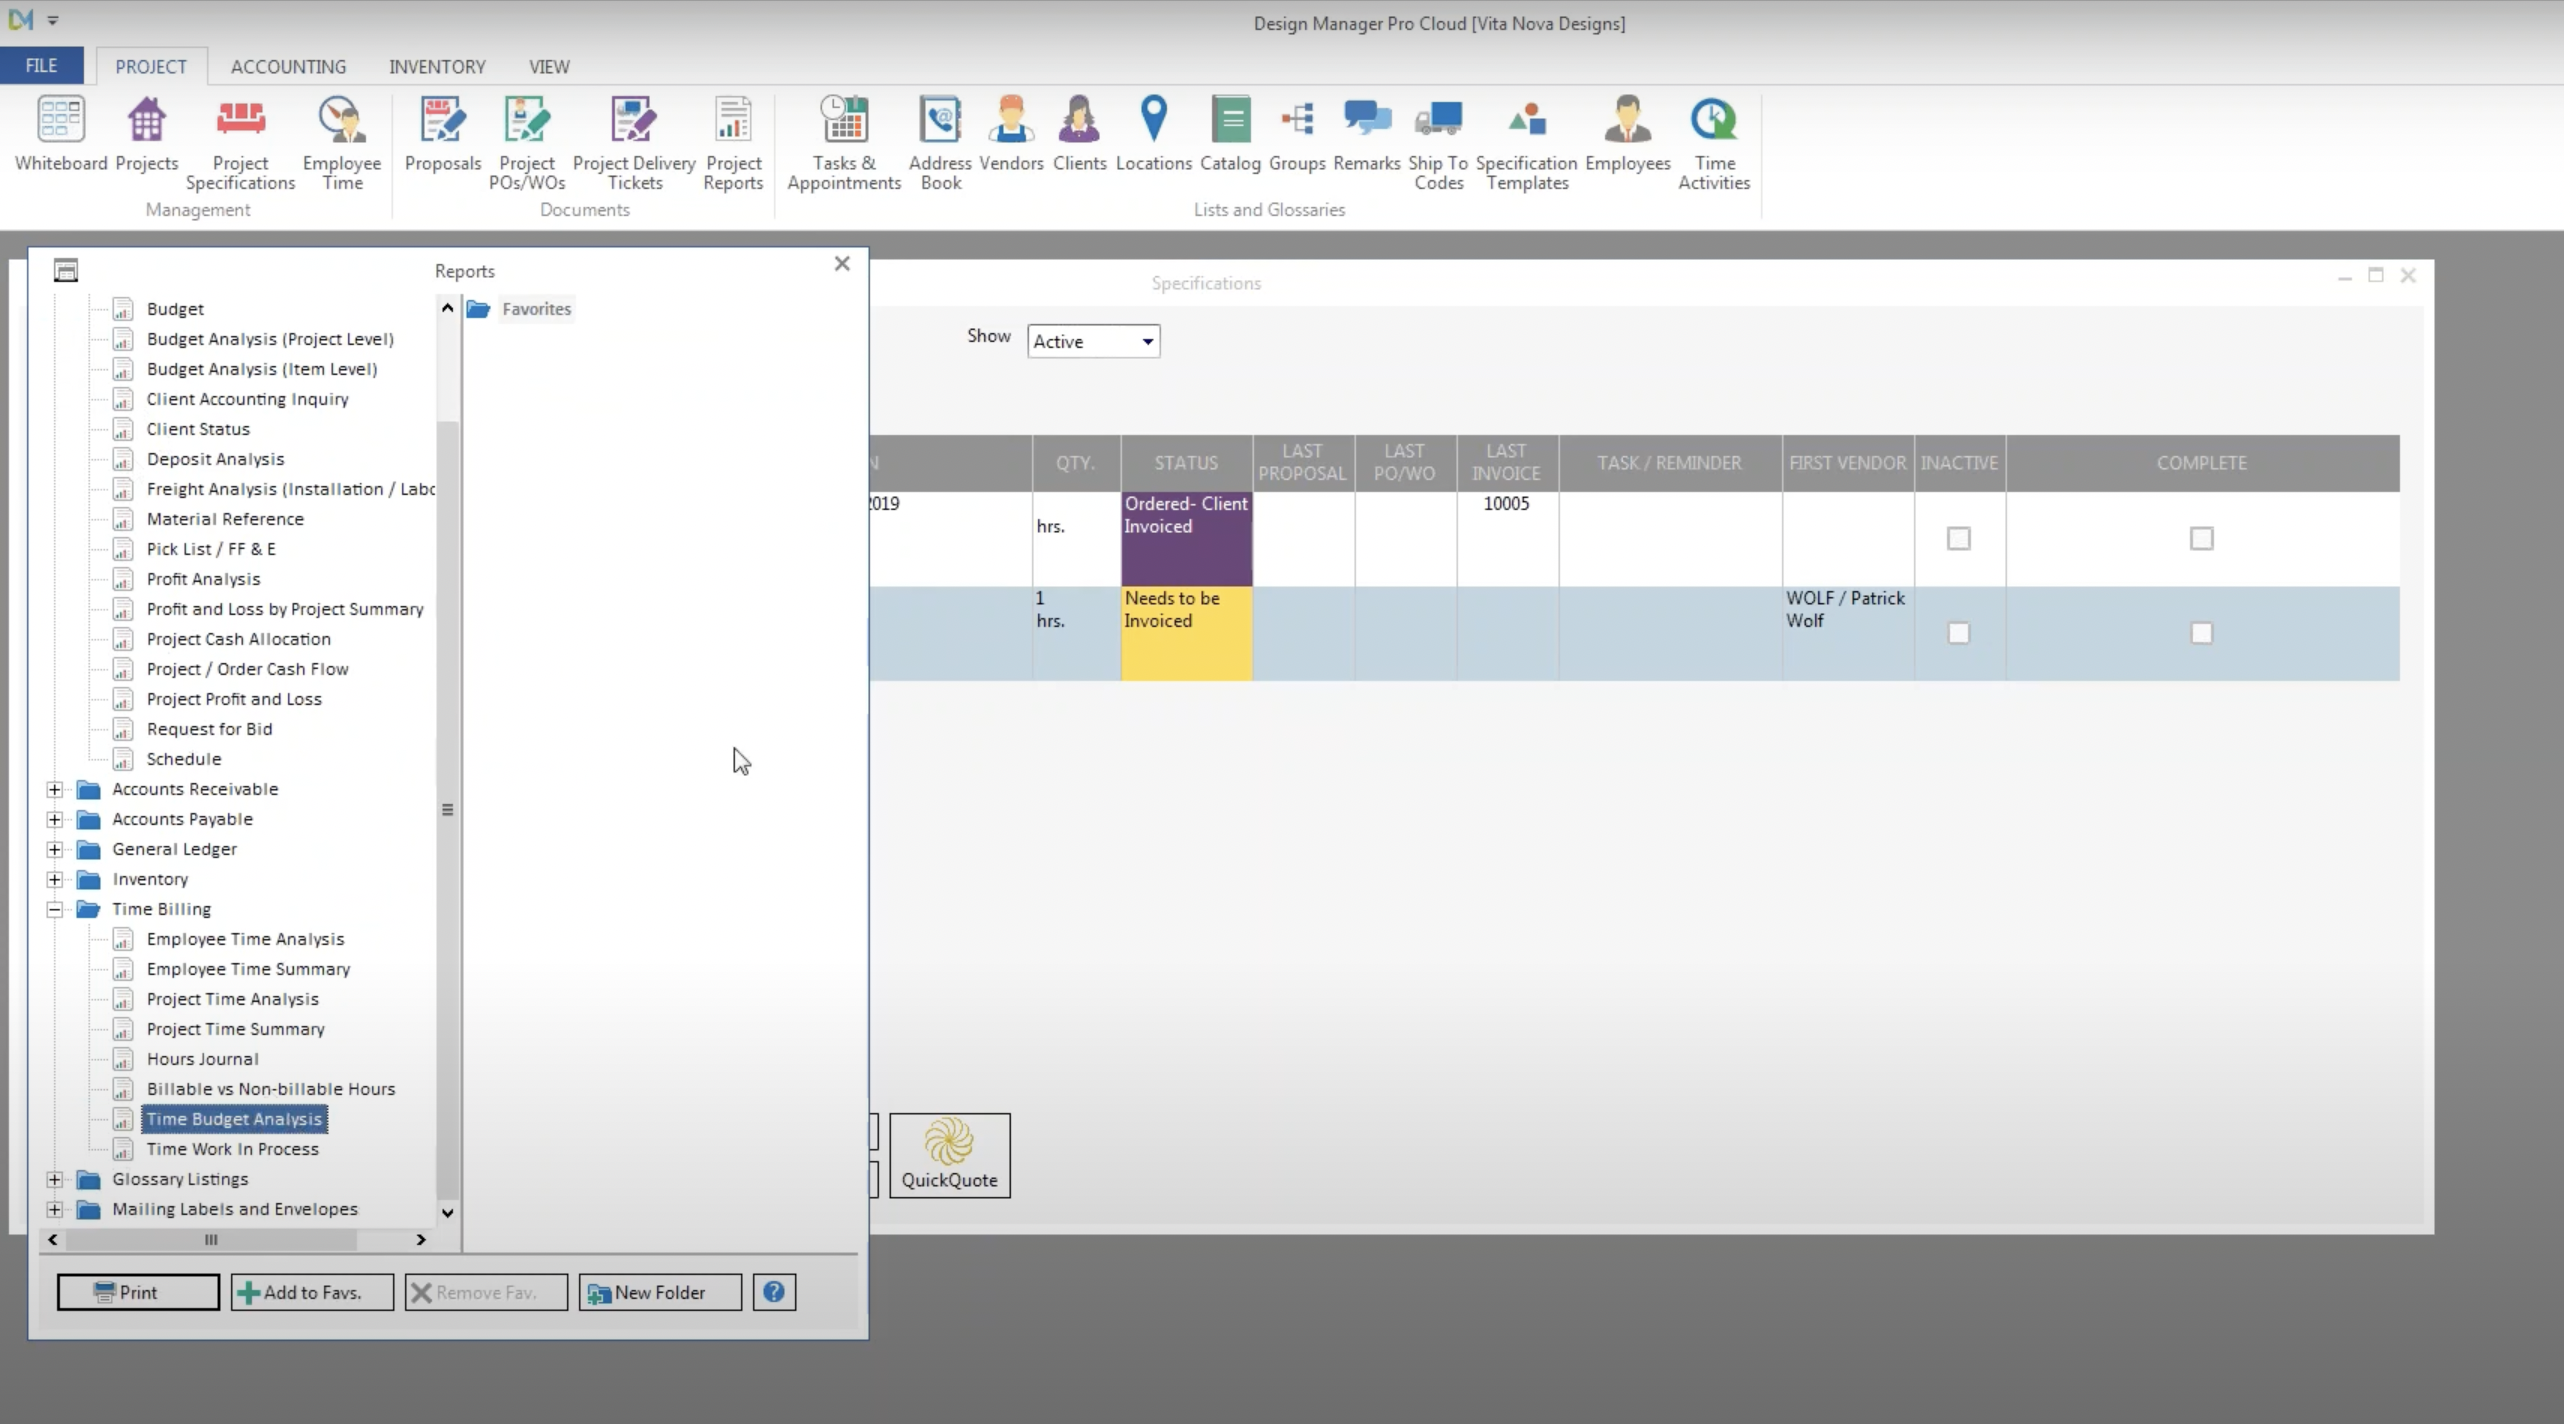
You can run a number of reports under the Time Billing Reports menu, including an “Employee Time Analysis”, “Billable vs. Non-Billable”, “Project Time Analysis”, and more.
Additional Time Billing Features
Design Manager has a few other features that make time billing easy for interior design businesses. For one, you can create time entries per employee by importing from timesheets that come from apps like HoursTracker and Harvest or more traditional sources such as Outlook and iCalendar. Any source that can produce a .csv, .xls or .txt file should be compatible. For more details on using the Time Import function, check out this detailed demo.
The Design Manager app also includes features to make time billing a breeze. The app’s built-in timer will let you track time as you work or enter hours after you are finished working. You can track time to specific projects and add notes, just like you can with the standard software, and any information added via the app will automatically sync to your Design Manager account.
How To Stay The Course
For a business to be successful, every incoming and outgoing dollar must be accounted for in an organized and consistent fashion. That’s why Design Manager offers a variety of ways to enter data along with controls that limit how other users can enter data, ensuring they do so according to your plan. Also, because Design Manager can track the granular details of time spent per client, using it’s reporting tools will keep you on top of everything you need to know about the efficiency of your business. Look at top-down data summarizations by a number of different metrics or break out the information into detailed reports. You can also view open time-related items during a project or after its completion, showing which time entries have not been invoiced to a client. Not all projects meet profitability expectations, so understand where you have wasted time in the past to come up with a strategy to ensure your business will thrive in the long term.
With so many ways to structure pricing, interior designers need a customizable solution to keep track of the many moving pieces. Time is money, and Design Manager’s advanced time billing features make sure you have the tools to quantify, qualify, and collect on your time spent without missing a minute. For more information on Design Manager’s time billing capabilities, watch this demo for step-by-step reenactments of the processes described in this article. If you are not already using Design Manager for your interior design business management, start a free trial today!